AutoPosing
- Home
- Tools
- Animation Tools
- AutoPosing
This feature predicts the pose that you want to make and sets it up for you automatically. The prediction is made based on the way you manipulate the controllers of a character.
Preparing the Characters
Currently, AutoPosing can work with the humanoid or quadruped characters.
Warning
Quadrupeds are only supported in the Pro and higher versions.
AutoPosing requires the standard Cascadeur rig to work.
This rig can be applied to both humanoid and quadruped characters. The easiest way to create it is by using the Quick Rigging Tool:
1. Open an empty scene.
2. Import a character into it (link to how to do it).
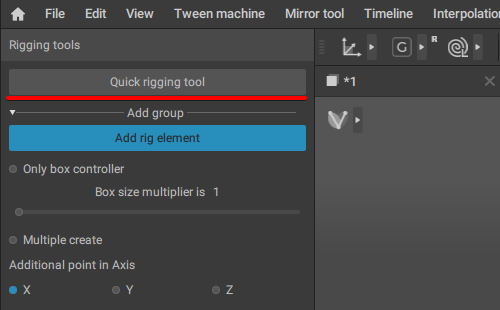
3. Enable the Rig mode::

4. The Rigging tools panel will appear. On that panel, click the Quick rigging tool button:
5. The Quick Rigging Tool window will appear:

6. In that window, select either Humanoid or Quadruped tab, depending on what kind of character you have, and proceed to create the rig.
To learn how to use Quick Rigging Tool, look here.
What you need to do is to set corresponding joints (listed on the left of the window) for every slot on the right. Otherwise, AutoPosing won’t be able to work with the rig.
Technically, only slots on the Body panel are required for using AutoPosing. However, finger joints (Hand Left and Hand Right panels) also influence the positions of AutoPosing controllers, so it would be a good idea to rig them as well.
The same goes for the twist joints (Twists panel), if your character has them.
After you set an appropriate joint for every slot:
6. Click Add rig elements.
The Quick Rigging Tool should close, and you'll see something like this in the Viewport:
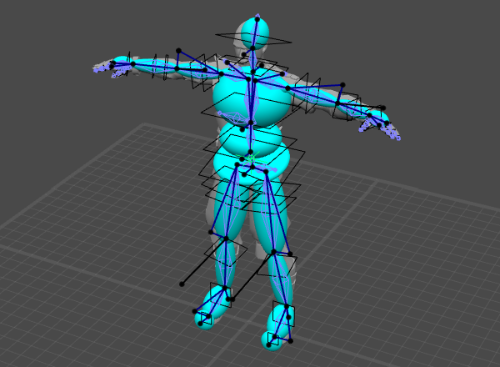
If, for some reason, Quick Rigging Tool did not close, close in manually.
Now you only need to finalize your rig:
7. Go to the Rigging Tool panel.
8. (optional) Enable Create autoposing:
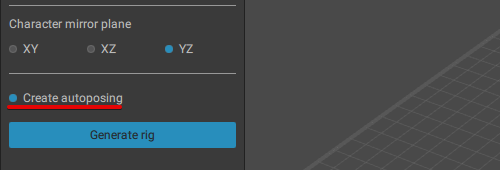
It means AutoPosing controllers will be generated along with the rig, so you won't have to wait a few moments when you enable AutoPosing.
This is not necessary, but makes the workflow a bit more convenient.
9. Click Generate rig.
10. Wait a bit until the rig is generated.
Keep in mind that by default, AutoPosing would change the character's pose at the first frame (usually, it is a T- or an A-pose) into a more realistic one.
If you don't want this to happen, go to the Settings Window and disable the Update autoposing option on the Rigging tool panel:

Now, AutoPosing should work for your character without any issues.
An example of AutoPosing applied to UE5 Mannequin.
How to Enable AutoPosing
1. Select an entire character (every point controller).
2. Click the Enable AutoPosing tool button on the Toolbar:

After this, a set of AutoPosing controllers will be generated.
This will also enable AutoPosing mode in the Viewport:
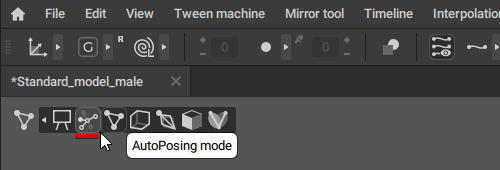
AutoPosing controllers can be viewed and interacted with only in this mode. Like any other View Mode, it can be switched on and off at any moment.
The Enable AutoPosing tool button should only be clicked once for one character. If you click the button again, the following error message will appear:

AutoPosing can work with several characters at the same time. If the scene includes a single character, AutoPosing is applied to it automatically. If there is more than one character in the scene, you’ll need to select point controllers of the character you’d like to use with AutoPosing.
How to Use AutoPosing
Once AutoPosing is enabled, you can use it to set up character poses.
To do this:
1. Select a controller.
2. Move it using Manipulators.
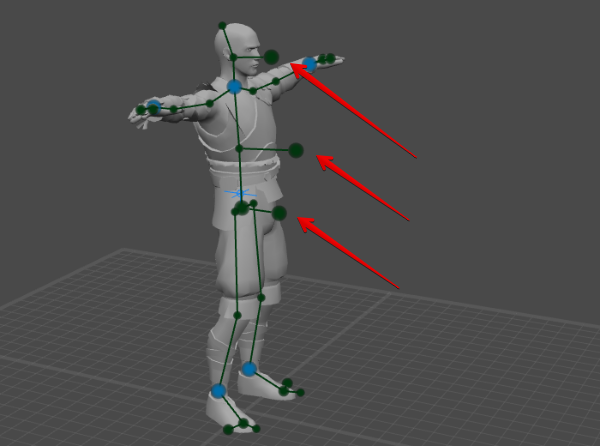
The rest of the character will move along with the controller, changing the entire pose:
By moving a controller, you activate it.
Active controllers are colored blue; they are used to set up the pose.
Inactive controllers are colored green; they react to active controllers being moved, but do not define the pose by themselves.
By default, all of the controllers are inactive. To use AutoPosing, you need to decide which controllers you'd like to be taken into account, and activate them.
To activate a controller:
1. Select a controller.
2. Move it.
The controller will be colored blue: this means that it has been activated. From now on, it will be used for generating poses.
Controllers can be deactivated as well:
1. Select a controller.
2. Click the AutoPosing: Switch lock button on the Toolbar, or press Shift + Z:

Alternatively, you can go to the Object properties panel and turn off the Locked parameter on the Input point tab:
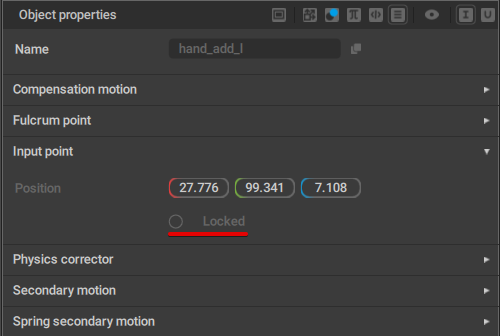
After this, the controller will be colored green once again, and won’t be used for generating poses.
Deactivating controllers can affect the pose generated by AutoPosing:
Note
Controllers at the character's ankles are always active. They cannot be deactivated.
Controllers can be fixed:
1. Select a controller.
2. Press R.
Fixed controllers are not taken into account when generating poses:
Note
It is not recommended to fix controllers in the middles of the controller chains (elbows, knees etc.), as doing this might lead to distortions when using AutoPosing.
To remove fixing from the controllers:
1. Select a controller.
2. Press R.
AutoPosing controllers change their positions when they are updated.
Normally, this updating process is called automatically as you move the controllers.
However, it can also be called manually. This can be useful when you, for example, would like AutoPosing to use a pose you've created with regular Point Controllers.
To do this:
1. Select one or several Point Controllers.
2. Click the AutoPosing: Update button on the Toolbar:

Keep in mind that using this option might slightly alter the pose you've set.
AutoPosing Controllers
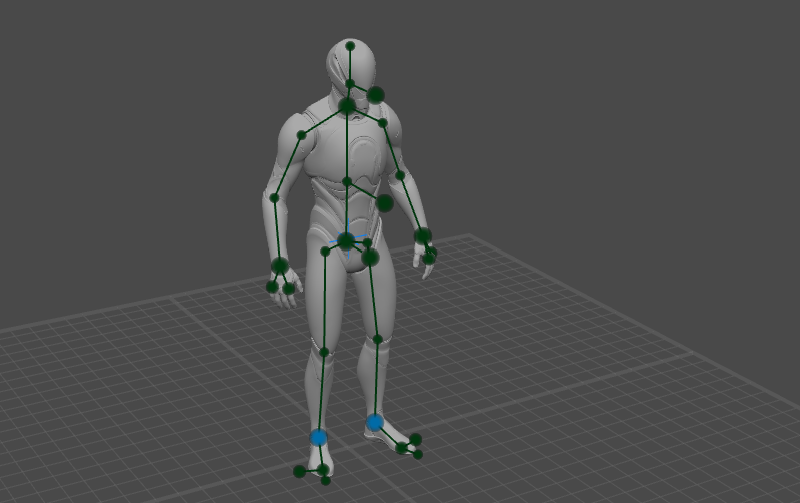
Once the tool is enabled, a number of controllers will appear on the character model.
Normally, the AutoPosing controllers are colored green.
Once you move - or otherwise adjust - such a controller, its color changes to blue.
What this means is that the controller has been activated and will be used to define a pose for the character.
Meanwhile green - inactive - controllers would merely move in accordance with the blue one(s) to reflect the current pose.
An active additional controller can be deactivated by selecting it and pressing Shift + Z. Doing this will change the pose accordingly.
Controllers can be adjusted as follows:
 |
Selection |
| x2 |
Selection with children |
| Hold + drag |
Select all active controllers with the red frame |
| R | Fixing / Unfixing |
| Shift + Z | Reset selected controller(s) to the default state |
 |
Adjusting |
Blue (active) controllers are only set for the current keyframe. They do not carry over to different frames. Different sets of additional controllers can be defined for different frames.
Note #1
Once unfixed, the controllers will assume new positions based on AutoPosing simulation.
Note #2
Point Controllers that do not coincide with AutoPosing controllers should not be fixed. Fixing them will lead to errors.
Controller Parameters
AutoPosing controllers have a specific group of parameters attached to them. These parameters can be found on the Object Properties panel, under the Input point tab:

This tab includes the following settings:
Position
The coordinates of the AutoPosing controller.
Visible
If this is enabled, the controller is visible in the Viewport.
Locked
If this is enabled, the controller is considered active and is used for generating poses.
Applies only to additional AutoPosing controllers. Main controllers do not have this parameter.
Direction Controllers
These controllers set the general direction for the character.
If you move a Direction Controller, it becomes fixed.
The fixed controller defines the general direction for the character. When you use AutoPosing, the character won’t rotate.
AutoPosing with Direction controller disabled:
AutoPosing with Direction controller enabled:
Note
This Direction Controller is specific only for the AutoPosing tool. It is not related to the Direction Controllers found in the regular Cascadeur rig and should not be confused with them.
Direction Controller Settings
A number of settings for Direction Controllers can be found on the Object Properties panel:
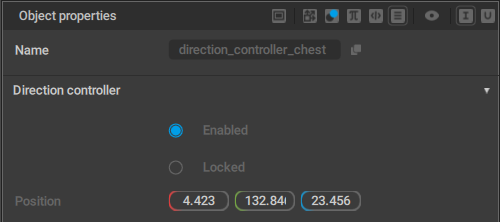
Enabled
When this option is enabled, the Direction Controller is visible in the Viewport, and can be selected and used.
A disabled Direction Controller can still be selected in the Outliner.
This option is enabled by default.
Locked
If this option is activated, the controller is locked. This means the controller’s position is taken into account when the character’s pose changes.
Like any other controller, the Direction Controller automatically becomes locked when it is moved. It can be un-locked by disabling this setting.
Position
The position of the Direction Controller (in world coordinates).
Additional Controllers

When you need more control over the poses AutoPosing produces, there are Additional Controllers.
These points work on the same principle as other AutoPosing controllers: they can be moved, activated and deactivated, fixed etc.
To enable Additional Points, click the AutoPosing: Additional points on the Toolbar (under the AutoPosing section):

To disable Additional Controllers, simply click the same button again.
AutoPosing for Weapons
Aside from the character body itself, AutoPosing is capable of working with props - such as weapons - that are attached to the character.
Using this feature requires some amount of preparation:
1. Go to the Rig Mode.
2. Rig the prop just like you would any other prop
See the Rigging Props page for more information on this subject.
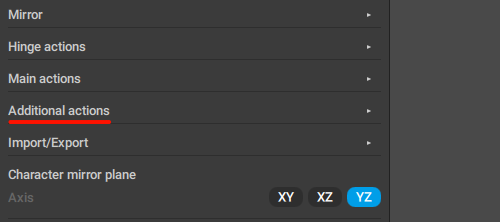
3. Select the rig element you’d like to add to AutoPosing.
4.On the Rigging tools panel, go to the Additional actions tab:
5. There, click the Add button under the Autoposing props section:
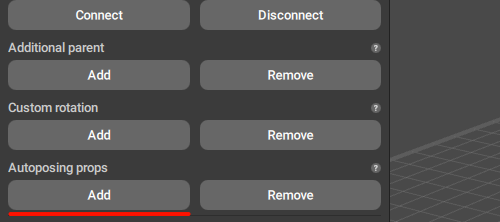
After this, the rig elements should become associated with the AutoPosing setup.
6. Finalize the rig.
If everything is done correctly, there should now be additional AutoPosing points:
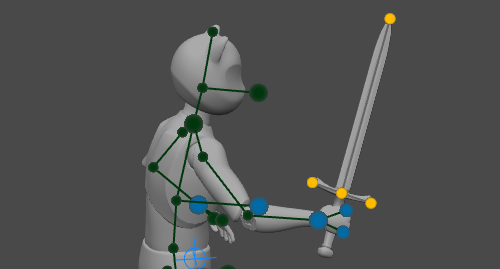
(Here, these posints are selected to make them easier to recognize; normally, they are colored gray)
This means the prop has been successfully added to AutoPosing, and can now act as a part of it.
AutoPosing and Copy Tools
AutoPosing controllers can have their positions copied and pasted - but only in Global coordinates.
Unlike, say, Points, these controllers do not contain data on their positions in relation to their parents. So if you try to copy AutoPosing controllers in the Local mode and paste them to another frame, you’ll get a different position.
There are, though, ways to circumvent this problem.
First: you can always use Point or Box controllers for transferring poses between frames.
These controllers do contain data on their local transforms, so copying them should work without issues.
Second: if you need to specifically use AutoPosing controllers, you can use the Relative to pivot mode. When this mode is enabled, controllers’ positions are calculated in relation to their pivot. So it can be used to imitate local copying.
To use it:
1. Enable both Local mode and Relative to pivot:

2. Select one or several AutoPosing Controllers - and a controller that will act as a pivot.
For the pivot, you should select the controller that is a parent to the ‘main’ group of controllers you’ve selected. For a hand, that would be the controller at the elbow; and for an arm - at the shoulder, and so on:

3. Place the pivot to this controller by holding Alt and clicking it with RMB.
4. Copy the positions of the controllers.
5. Go to another frame.
6. Without deselecting any of the controllers, paste the copied positions.
This way, you’ll be able to copy and paste AutoPosing controllers more or less as if they were in the Local coordinate mode.
Snapping Inverted Angle
This parameter defines an angle at which a character’s body part returns to its original position (in relation to its parent object).
If the angle between a body part and its parent does not exceed this value, it bends normally:

However, if the value is greater, the objects behave differently:
The parameter can be found in the Settings window, under the AutoPosing tab:
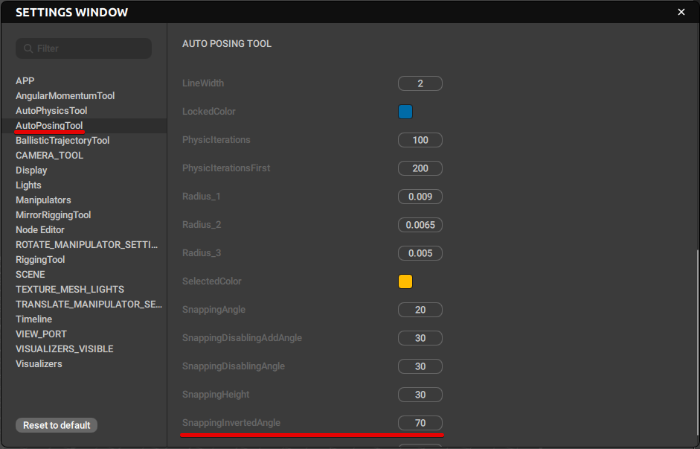
It is measured in degrees; its default value is 70.
Important note
AutoPosing overwrites pre-existing poses.
Because of this, it should be used either for creating a draft of the animation, or for creating animation as a whole.
You can switch from AutoPosing to the regular rig and make adjustments to the poses generated by AutoPosing. But if after this you switch back to AutoPosing, it will overwrite the poses you've set.