Reference
- Home
- Animation Pipeline
- Reference
Before you start animating, we recommend studying some kind of reference. For example, you can watch videos with people performing the motion you want to animate. This helps to get a better understanding of the whole movement and its elements.
Once you have an idea of how the motion should look like and what poses make it up, it is time to create a rough draft of your animation. This can be done by defining several key poses at the crucial points of the motion.
How to Set Up an Animated Reference
There is more than one way of setting up a reference. However, the easiest one would be using the Reference video option.
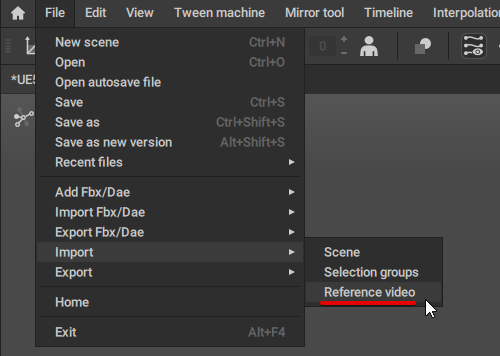
1. Select Reference video from the File menu:
2. The Load Video window should appear:
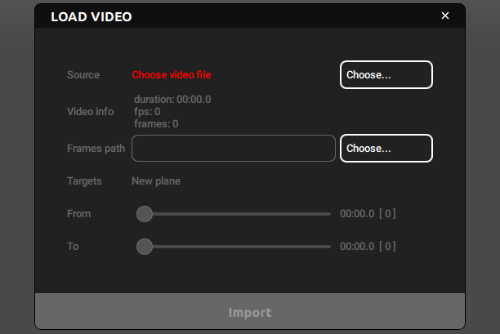
In this window, click the Choose… button to the right of the Source, and select the video file you intend to use as a reference.
After you've selected the reference video, click on the Choose… button to the right of the Frames path. Specify the folder which will be used to store the images from the chosen video.
Note
Currently, only the .mp4 files that have been encoded with the H264 codec are supported.
The window also contain some additional parameters you can use to fine-tune your reference:
Video info
Shows various data concerning the video file you’ve selected: its duration, its speed (fps), and the total number of frames in it.
Frames path
Sets a folder that will be used for storing frames.
From and To
These sliders set the exact part of the video that will be applied to the reference.
After everything is done, click Import.
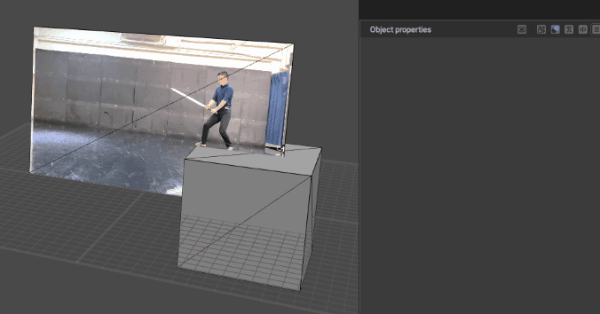
A plane with a reference should appear in the scene:

Customizing Reference Objects
After the reference plane is created, you can set up how it should be rendered in the Viewport. To do this:
1. Select the planet.
2. In the Outliner, go to the Mesh object tab:
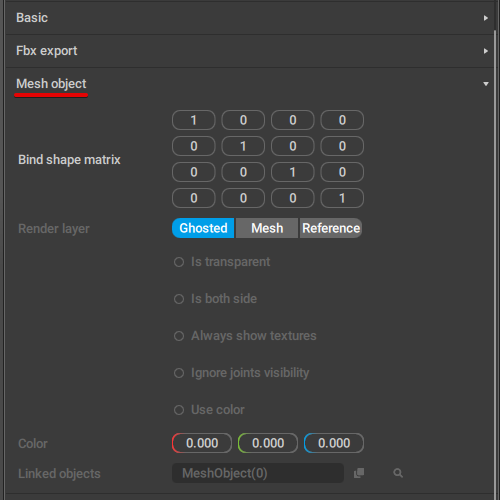
2. Set the settings you need:
Render layer
If this is set to Reference, the plane will always appear behind other objects.
This setting is often used for the reference plane.
Is transparent
Makes the plane transparent. This setting can be useful for character meshes when you need to set a particularly complex pose.
Is both side
If this is enabled, the texture on the plane will be visible from both side (by default, it is only visible from the front). Can be used with the reference plane in some cases.
Always show textures
If this is enabled, textures assigned to the mesh are always visible in the Viewport, even when they are disabled in the Visible menu.
This option is enabled by default for the meshes created through the Reference video option. For other meshes, it should be enabled manually.
The Legacy Way
Animated reference can also be set up manually, by creating a mesh object and assigning an animated texture to it.
In previous versions of Cascadeur, this was the only way to set up an animated reference. Nowadays, it is not recommended to use for most cases (as it is significantly more cumbersome and inconvenient), but it can still come in handy for some specific situations: for example, when you only have a sequence of images instead of a video file, or when you’d like to apply reference to some object that already exists in the scene (instead of creating a new one).
1. Select Add → Plane from the Commands menu to add a plane to the scene.

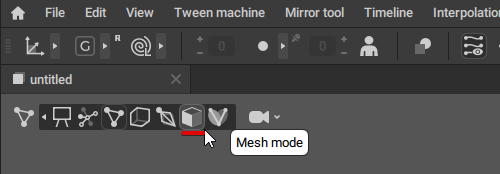
2. Switch to the Mesh Mode:
3. Select the plane and use Manipulators to adjust the size and position of the plane.
Usually, a reference plane should be placed behind the character.
Now we need to add a video to the plane.
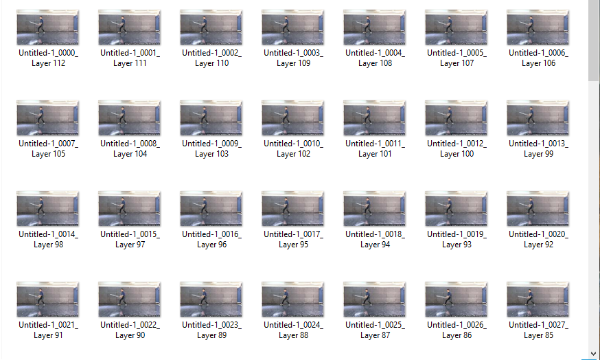
Cascadeur doesn’t currently support video textures, so you’ll need to save the video as an image sequence. This can be done in any video editing software.
A resulting sequence should look like this:
To add this sequence to the plane:
4. Select the plane (if it isn't selected already).
5. Click the Bind Texture button:

6. Select every file of the image sequence and click Open to apply them to the mesh.
After this, the sequence should be applied to the plane. One file in the sequence equals to one frame of animation.
Keep in mind, however, that by default textures are not shown in the Viewport. To make them visible, you'll have to enable them manually:
7. In the Outliner, go to the Mesh object tab.
8. There enaqble the Always show textures option.
You can also set the frame from which animated reference should start:
9. Select the reference plane (either in the Outliner or in the Viewport with the Mesh Mode enabled).
10. In the Outliner, go to the Texture container tab and set the Start frame:
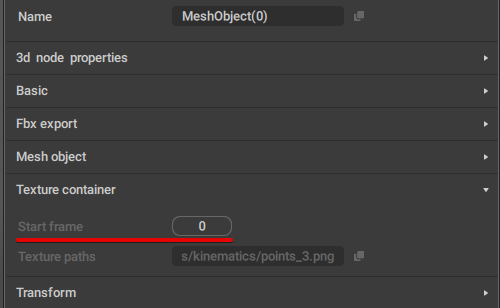
Now, the animation will start playing at the frame you’ve set.