Collision Shapes
- Home
- Rig
- Rig Structure
- Rig Elements
- Collision Shapes

Collision Shapes (or Colliders) are objects that are used for calculating a character’s interaction with other objects in the scene.
This part of the rig is used by the following tools:
By default, Collision Shapes are only visible in the Rig Mode and in Rigging View mode.
However, you can make them visible by enabling Colliders in the Visible menu:

Working with Collision Shapes in Rig Mode
Collision Shapes can be added while you’re in the Rig Mode.
At least one collision shape is added automatically to Rigid Bodies, both when they’re created using Quick Rigging Tool and manually.
Creating Colliders
To manually create a collider in Rig mode:
1. Select a Rigid body in the Viewport.
2. Click the Add button in the Collisions section:
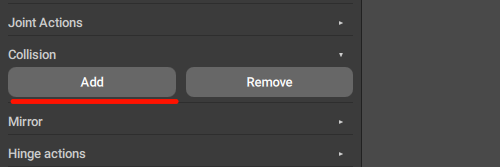
3. Then, select a type for the collider:
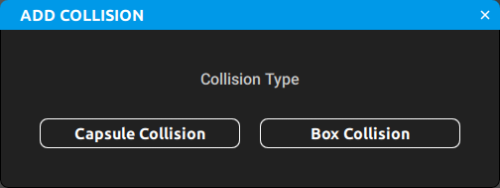
There are two default options available for Rigid bodies: a capsule-shaped (Capsule Collision) and a cuboid-shaped (Box Collision) object.
After this, a new Collision Shape will be created and attached to the Rigid Body you selected.
Newly created Collision Shape’s dimensions are matching the size of the Rigid Body; you can first change the Rigid Body’s size by adjusting the 'Ellipsoid' vector value to fit your character mesh and then remove and add a new Rigid Body.
This operation should be done for every part of the rig that needs a collision object. Otherwise, the body part without a collider will be passing through the floor and other colliders.
Once a Collision Shape is created, it can be selected along with the rig element it is attached to.
If you select a rig element in the Outliner, there will be a dedicated group of settings on the Object Properties panel:

It will be different depending on thetype of the collider: a Capsule collision, or a Box collision.
The settings it contains will differ as well.
Removing Colliders
To manually remove a collider in Rig mode:
1. Select a collider object in the Viewport.
2. Click the Remove button in the Collision section:
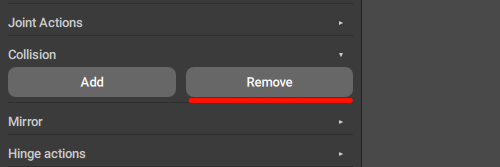
After this, the selected Collision Shape will be removed.
Adjusting Colliders
In certain cases, collision shapes in your character’s rig might need some manual adjustments, to better fit your character’s mesh.
Selected Collision Shapes can be moved and rotated in the Viewport with a Manipulator, just like other regular Transform objects.
The Scale manipulator does not work for Collision Shapes, but you can change their dimensions in the dedicated group of settings: Box collision or Capsule collision, depending on the type of the Shape:

Both contain parameters for adjusting the dimensions of the corresponding shapes.
This can be useful when you want Collision Shapes to better match the surface of the character model.
For the same reason, you can add more than one Collision Shape to a rig element.
Some of the default Cascadeur rigs use this, especially for the characters’ feet:

Working with Collision Shapes in Animation Mode
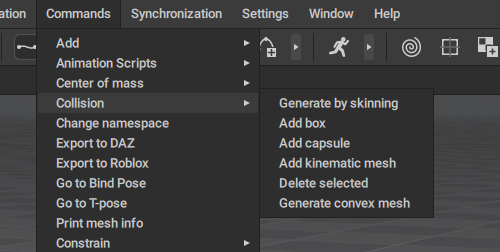
Colliders can also be managed in the Animation Mode, using a set of options in the Commands menu:
Note
This section will talk about the Collision Shapes in the character rig. If you want to learn how to apply colliders to environment objects, see the Interaction with Environment page.
Creating Colliders
To create a collider:
1. In the Viewport, select an object to which you’d like to add a collider.
It can be a Rigid Body, or a Mesh.
2. Open the Commands menu and go to the Collision section:

3. There, select one of the options to create a collider.
There are several types of colliders you can create.

A box-shaped collider that surrounds the object.
This collider can be applied to both Meshes and Rigid Bodies.
To create a Box collider, use the Add box option.

A collider shaped like a capsule (a cylinder with hemisphere for caps).
This collider can also be applied to Meshes and Rigid Bodies alike.
To create this collider, use the Add capsule option.

Creates a Kinematic mesh: a polygonal collider that uses the object’s actual geometry for calculating collisions. Using kinematic meshes allows for very accurate collisions, but can be slow when geometry is complex.
This collider only works with Meshes.
To create this collider, use the Add kinematic mesh option.

A convex mesh, i.e. a polygonal collider - or several such colliders - that roughly follows the shape of the selected object.
It works faster than kinematic meshes, but is less precise.
This collider also only works Meshes.
Note
Currently, there are no means of attaching Convex meshes to Rigid Bodies, but they will be added in the future.
To create a convex mesh, use the Generate convex mesh option.
Once you do, you’ll see this dialog:

Here, you can set several parameters that influence how close the shape of the collider will be to the original mesh.
These parameters are:
N Max Convex Hulls
Sets the maximum number of convex primitives that the algorithm would use to approximate the geometry. Higher values provide more accurate collisions at the cost of performance.
Resolution
Sets the maximum voxel density (voxels are used to analyze the shape of the object). Higher values yield better results, but increase compute time.
Volume Error
Sets how much volume simplification is allowed for the algorithm when creating convex hulls.
Max Recursion Depth
Sets the recursion level, i.e. how many times the algorithm can split the object into smaller hulls if needed. Higher values provide better results for complex shapes with many concave areas.
Fill Mode
Defines the exact way of how the algorithm should fill the empty scapes inside convex decompositions..
There are three options available:
0 means the object is solid
1 means the algorithm only wraps the surface and ignores internal cavities.
2 is better for hollow objects (like pipes, for example).
Once you set the parameters, click Ok, and the convex mesh will be created.
If a convex mesh consists of more than one collider, all these colliders will be listed on the Object Properties panel, and can be adjusted independently.

Similar to convex mesh, but generates a collider based on the skinning data (i.e. how the Joints influence the mesh when moved).
This collider works with Rigid Bodies - but only if these Rigid Bodies are associated with a Mesh that has skinning data.
Should be used when you need a collider that deforms along with the character mesh.
To add this collider, use the Generate by skinning option.
Note
As of version 2025.3, Generate by skinning command is experimental and may not work with all character models.
When you select that option, you’ll see the dialog:

Here, you can adjust parameters that influence how exactly should the collider be generated.
The parameters are:
Weight threshold
Sets the minimum value for the skinning weight of a vertex. If the weight exceeds this value, the vertex is taken into account when creating the convex collision shape.
Hull Tolerance
Sets the minimum distance between vertices. If two (or more) vertices are close to each other than this distance, they are considered a single vertex; instead of their individual positions, the average of their coordinates is used.
Increasing this value can make the collision shape more accurate, but at the cost of performance.
Once you set them, click Ok, and the collider will be generated.
Removing Colliders
To delete a collider:
1. In the Viewport, select the object that the collider is attached to.
2. Select Collision → Delete selected from the Commands menu:

This will remove any colliders associated with the object.
Adjusting Colliders
After a collider is created, you can manually adjust its parameters.
To do this:
1. Select the object in the Viewport.
2. Go to the Object Properties tab.
3. There, go to the section that corresponds to the type of collider that’s attached to the object.
For a capsule, it’s the Capsule collision, for a box - Box collision, and so on.
There, you’ll find a set of parameters associated with the collider:

Is active
If this is enabled, the collider is taken into account when physics simulations are run.
Enabled by default.
Length
Sets the length of the capsule.
Radius
Sets the radius of the capsule.
Position
Sets the coordinates of the capsule’s center in relation to its parent.
Rotation
Sets the rotation of the collider (across three coordinate axes) in relation to its parent.

Is active
If this is enabled, the collider is taken into account when physics simulations are run.
Enabled by default.
Size
These three values set the dimensions of the box.
Position
Sets the coordinates of the center of the box in relation to its parent.
Rotation
Sets the rotation of the collider (across three coordinate axes) in relation to its parent.

Note
Skinned mesh collider uses these settings; there is no separate group of settings for it.
Is active
If this is enabled, the collider is taken into account when physics simulations are run.
Enabled by default.
Position
Sets the coordinates of the center of the convex mesh in relation to its parent.
Rotation
Sets the rotation (across the X, Y and Z axes) for the convex mesh, in relation to the collider’s parent.
Scale
Sets the three scaling factors (for the X, Y and Z axes) for the convex mesh.
By default, all three values are equal to 1.

Is active
If this is enabled, the collider is taken into account when physics simulations are run.
Enabled by default.
Position
Sets the coordinates of the center of the kinematic mesh in relation to its parent.
Rotation
Sets the rotation (across the X, Y and Z axes) for the kinematic mesh, in relation to the collider’s parent.
Scale
Sets the three scaling factors (for the X, Y and Z axes) for the kinematic mesh.
By default, all three values are equal to 1.
Every object that has a collider, also has a Collision Material group of settings. These settings define how physics simulations should work with the collider.

Collision type
This option sets the type of collision that should be used for the object.
Sufrace means the algorithm is applied when a character (or other object) collides with any point of the collision object.
Pin means the algorithm is applied to every frame where the character interacts with the object, as if the character is suspended on some kind of climbing hold.
When Ragdoll is applied, a Pin collision is interpreted as a fixed point.
When Physics Corrector is used instead, this collision is interpreted as a point at which a force is applied (the direction of this force can be arbitrary).
The difference between the 'surface' and the 'pin' type of collisions is described in greater detail on the Physics Corrector page.
Friction
Sets the force of friction for the collision.
Bounciness
Sets the rebound force for the collision.
Intersections
When you create Collision Shapes for your rig, you can end up with shapes that intersect with each other:

These intersections can be ignored when it is parent and child colliders that intersect. For example, when an arm collider intersects with a collider for the clavicle, there won’t be any negative effect.
But in other cases - like with the neck and a clavicle on the picture above - such intersections might lead to issues.
If you only plan to use the Interaction with Environment feature, this can be ignored.
But if you enable Ragdoll, you’ll need to adjust the setting so the intersecting shapes would ignore each other.
If you are using the Quick Rigging Tool, this is done automatically.
In other cases, however, you’ll have to set things manually.
Note
This should be done in the animation mode (i.e. after the rig is completed).
To do this:
1. Select the shapes.
2. Go to the Node Editor:

3. You’ll see nodes that represent the Collision Shapes you’ve selected.
4. Select one of these nodes.
5. Open the panel at the left.
6. Find the Collision Material group of settings:

If there is no such group, add it by clicking the plus icon and searching for Collision Material:

7. Now, lock the panel by clicking the lock icon.
This way, it won’t disappear when you deselect the node.
8. Select the node that represents the shape you want to set as ignored.
9. Hold Ctrl and left-click the ignored_objects field.
10. The shape you’d selected should be added to the ignored list:

Now, this Collision Shape won’t register intersections with the shape you’ve added to the field.
Repeat these steps for each shape you want to set as ignored - and for each shape you want to ignore some other shapes.