Joints
- Home
- Rig
- Rig Structure
- Rig Elements
- Joints
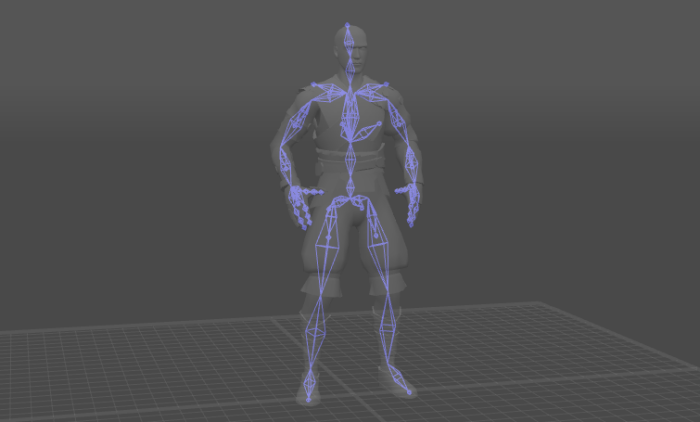
Joint elements of a character rig (shown with the silhouette of the character)
You can view Joints (i.e. bones that make up character skeleton) in the Joint Mode.
Joints make up an essential part of the rig: they are used to deform character Meshes in accordance with the positions of the elements of the rig. Each joint corresponds to a particular part of a mesh (or several meshes) that moves along with it.
Joint mode can be used for editing poses, but doing so is not advised as Point Controller mode offers more convenient means for this.
Joint Settings
Several specific sets of settings are available for Joints in the Outliner window.
Fbx Export

This set of options controls how Joints and Meshes are exported to the FBX format.
Rotation order

This parameter sets the rotation order used for the selected object.
When you export your animation, custom rotation order might be necessary to bypass the gimbal lock problem. This problem does not occur in Cascadeur itself because instead of Euler angles it uses quaternions for calculating rotations.
Is exported
If this is enabled, the object is exported to the FBX format. Otherwise, the object is ignored during export.
Export translate animation
If this is enabled, the object's transations (changes in its coordinates) are exported to the FBX format. Otherwise, they are ignored.
Export rotate animation
If this is enabled, the object's rotations (changes in its spatial orientation) are exported to the FBX format. Otherwise, they are ignored
Export scale animation
If this is enabled, the object's scale is exported to the FBX format. Otherwise, the scale reamains constant.
Use namespaces
If this is enabled, the name of the exported object would include its namespace. This can be used when a scene has two or more identical objects (such as two characters with the same mesh), so the namespace is necessary to distinguish them.
Otherwise, the namespace is ignored.
Disabled by default.
Joint

This set controls how the Joint is shown in the Viewport.
Use color
If this is enabled, you can set a custom color for the joint (using the Color parameter).
Disabled by default.
Color
Sets a custom color for the joint. Only works when Use color is enabled.
Width
Sets the width value for the joint.
The default value is 1.
Joint extra attributes

Joint type
Defines the type of the Joint for export.
There are three options available: Root, Limb and LimbNode; the latter is the default value.
In most 3d software (like Maya or Blender) this parameter is ignored, but some programs - such as Daz Studio - make use of it. In Daz in particular, the root Joint should have its Joint type set to Root, while every other Joint should be a LimbNode.
Creating Joints
Usually, joints are imported to Cascadeur scenes along with 3d meshes. Sometimes, however, you might need to add joints directly to the scene.
To create a joint, select Add → Joint from the Commands menu:
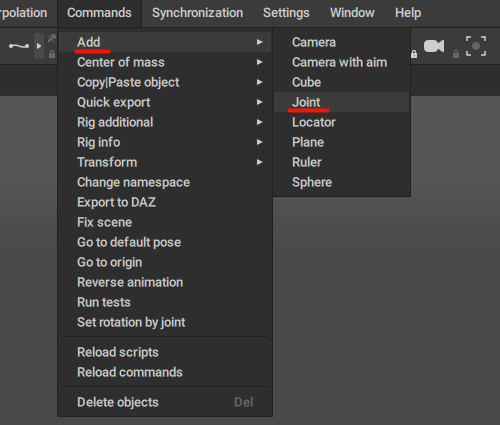
Note
The joints created this way are empty and can’t control the imported model. If you want to change the model’s skeleton hierarchy and add a new joint, it has to be done in another software that supports weight painting.