Fulcrum Points
- Home
- Tools
- Physics Tools
- Fulcrum Points

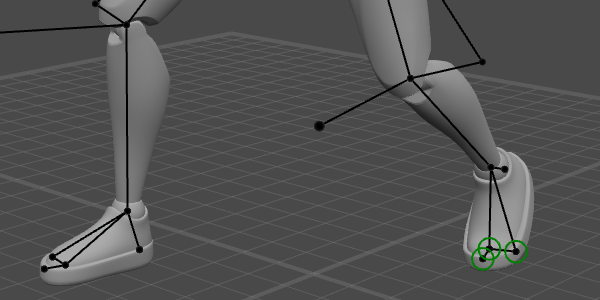
A character with Fulcrum Points enabled (shown as green circles).
Fulcrum points represent parts of the character that contact an obstacle (such as the gound, a colision object or another character).
These points play are used in many tools in Cascadeur:
By default, Fulcrum Points are not visible in the scene.
To enable them, click the Show fulcrum points button on the Toolbar:

Overview
The algorithm recognizes Point Controllers as Fulcrum Points based on two conditions:
1. The point should be close enough to the ground level.
2. Between the frames, the Point should not move - or only move by a minimum distance.
When these conditions are met, the Point Controller is considered a Fulcrum Point.
If an interval has at least one fulcrum point, the character is considered to be standing on the ground.
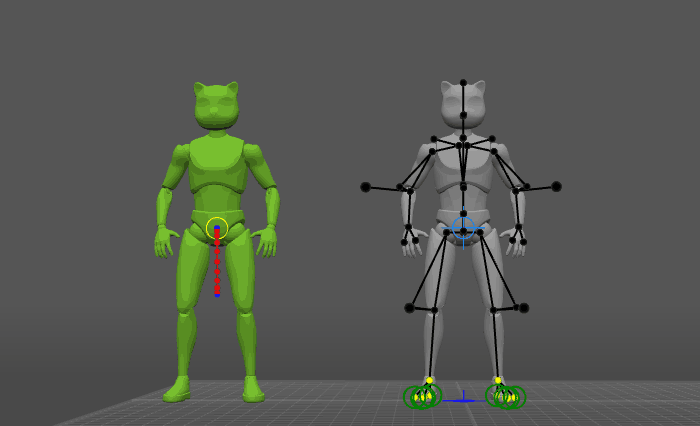
The Point Controllers that are recognized as Fulcrum points are marked with a green borders for the character model (but not for the physics ghost):
This happens automatically and does not require any user input.
There are, however, options for customization.
You can enforce the state of the Fulcrum Points by selecting points and changing Fulcrum state in object properties:

Fulcrum means the controller is considered a fulcrum point when the conditions are met. This is the default value.
Enforce means the controller is always considered a fulcrum point, even when the conditions are not met.
NotFulcrum means the controller is never considered a fulcrum point.
Setting Fulcrums Manually
You can also use the manual method of working with Fulcrum Points.
To enable it, switch the Is Custom Logic Fulcrum Point parameter to the Off value (in the Settings Window, under the Custom Logic Fulcrum Point tab):

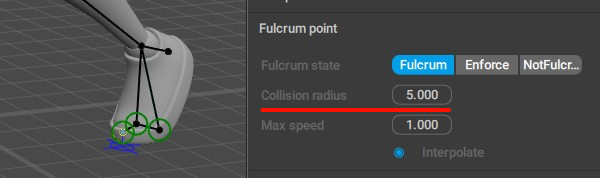
Then, you'll be able to control Fulcrum Points using parameters found on the Object Properties panel, under the Fulcrum Point tab:

Collision radius defines how close the Point should be to the ground level. If the Y coordinate for the point does not exceed this value, the point is considered a fulcrum:

Max speed sets the limit for the distance the point could travel to be recognized as a fulcrum.
If the point does not move to a distance greater than the Max speed multiplied by the number of frames between the keyframes, it is recognized as a Fulcrum Point on this interval:

These parameters are parts of the Fulcrum point behavior which is by default applied to every Point Controller.
Examples of Using Fulcrum Points
Manipulating Fulcrum Points can greatly affect the behavior of the AutoPhysics simulation.
For example, the simulation can make the character jump when you’re trying to make a squat:
Why does this happen?
If you look closely at the character’s legs, you’ll notice that they slide on the ground, moving backward:
Because of this, the AutoPhysics tool does not recognize them as fulcrum points.
And where there’s no fulcrum points, there’s only one kind of motion possible: ballistic motion, i.e., jumping.
But if we copy the feet positions from the frame 0 to the whole interval, they won’t move anymore, and a fulcrum area will appear:

As you can see, squats work correctly when there are fulcrum points.
So when you’d like to apply AutoPhysics to your animation, make sure that the animation has some fulcrum points.
And this is exactly why in most cases, AutoPhysics cannot work with stay-in-place animation.

Common Issues
Multiple Fulcrum Points
Having a big number of Fulcrum Points in a scene may cause issues.
Oftentimes, these issues can be fixed by decreasing the number of fulcrum points.
To do this:
1. Select a Point Controller that you don’t want to act as a fulcrum point.
2. Go to the Object Properties panel.
3. Open the Fulcrum point tab.
4. Set it to Not Fulcrum:

5. Repeat for every fulcrum point you’d like to disable.