Export FBX/DAE
- Home
- Getting Started
- Export FBX/DAE
Cascadeur gives you an option to export your work in various formats to use it in other software.
Export FBX/DAE
Hot key: Shift + F8
To export a Cascadeur scene - or a part of it - into either FBX or Collada file:
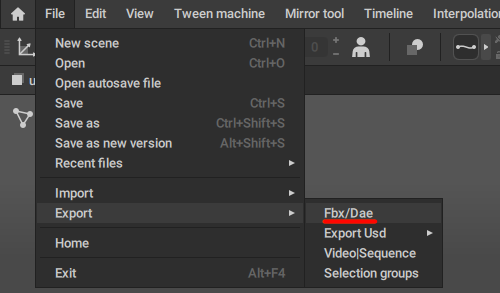
1. Select Export → Fbx/Dae from the File menu.
2. The FBX/DAE Export dialog window will appear:

In this window, you can set up various parameters to define how exactly your scene should be exported.
Presets
Here, you can select one of the predefined setting schemes, each one optimized for a particular task.
Available options are:
Animation is for exporting animation data without models or auxiliary objects.
Model is for exporting only the 3d meshes without animation attached to them.
Scene exports the entire Casacdeur scene.
Scene - selected objects is like the previous one, but only take into account the currently selected objects.
EXPORT
This section contains settings that define what parts of the model should be exported.
Export selected intervals
If this option is enabled, only animation data from the currently selected frames is exported; animation from other frames is ignored.
Disabled by default.
Export selected objects
If this option is enabled, only the currently selected objects are exported; the rest of the scene is ignored.
Also disabled by default.
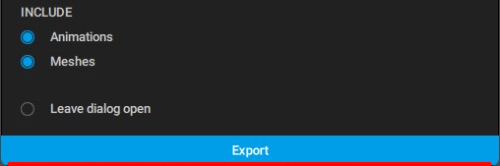
INCLUDE
These options define what should be included in the exported file.
Animations
If this option is enabled, animation data is included in the exported scene.
Enabled by default
Meshes
If this option is enabled, the meshes (3d objects) are included in the exported scene.
Also enabled by default.
Once you’ve finished setting up export options, click the Export button:
Then set the name and destination for the file to save your scene to.
Settings
Type Fbx ascii
Defines the format the scene is described in an FBX file.
ASCII means the scene is stored as text, while Binary means it is stored as binary (numerical) data.
This setting can be used when, for example, you need to export your scene to a software that only supports this ASCII format.
By default, it is set to Binary.
Apply euler filter on export
If this option is enabled, Cascdeur applies the Euler filter to a 3D model when it is exported to any external format.
Euler filter automatically sets the model’s rotations to the lowest possible values (i.e. 270, 630 or 990 all become -90).
Enabled by default. Disable it only when you run into rotation-related problems when exporting your scenes.
Bake animation
If this option is enabled, animation is baked on export, i.e. every frame of the animation is converted into a keyframe (this is done so animation would look the same in any external software regardless of how this software handles interpolation).
Also enabled by default.
Fbx up axis
Sets the axis that should be considered the up axis when the scene is exported to FBX format.
There are two options: Z and Y. By default, the Y axis is selected.
Leave dialog open
If this is enabled, the export window is left open after the scene is exported. Otherwise, it is closed.
Disabled by default.
Export Video
Another available option is to export an animation as a video file.
To do this:
1. Select Export → Video|Sequence from the File menu:

2. The Export video window will appear:
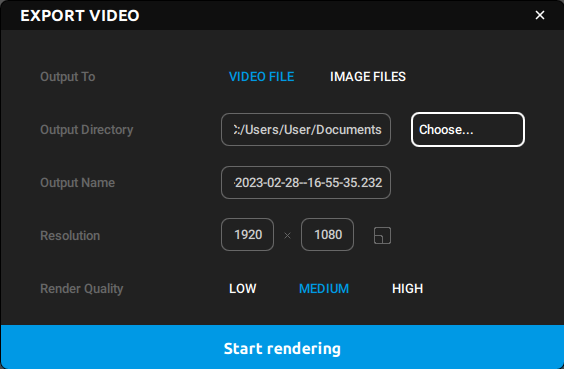
3. In this window, you'll need to set the output parameters for your video file:
Output To defines whether the scene should be rendered as a video file (the video file option), or as a sequence of pictures (the image files option).
Output Directory sets the folder to store the rendered scene.
Output Name sets the name for the video file/image sequence files.
Resolution sets the width and the height of the video/images. Resolution can be set manually or selected from one of the presets (to select a preset, click the square-shaped button to the right from the resolution values).
Render Quality defines the quality/level of compression for the video/images. Higher values result in better quality, but also increase the size of the file(s).
4. Once the parameters are set, click the Start rendering button.
Export Customization
Animation export in Cascadeur can be customized within wide limits.
For example, you can choose which joints should be exported and which to ignore. The same goes for animation: it is possible to manually set types of animation - such as translation, rotation etc. - to be ignored for a particular joint during export.
To customize animation export:
1. Select a joint or a group of joints.
2. Go to the Object Properties panel.
3. Open the FBX Export tab:
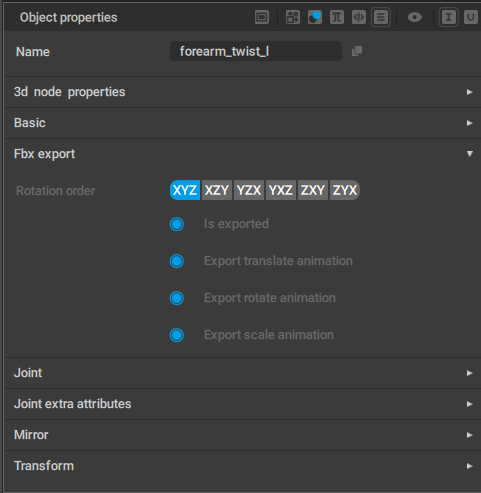
There, you will find a set of options for controlling how exactly the selected joint(s) (and animation assigned to them) should be exported.
These options are described in greater detail on the Animation Behaviors page.
Note
The options have to be set manually for every joint that requires custom export settings.
Common Problems
If something goes wrong during export, you’ll get the Export scene: failed message.
To determine the problem, open the Event Log and see what errors have occurred during export.
Some of the common issues include:
Multiple objects having the same full name
This occurs when the scene has two (or more) characters with identical root objects.
Solution #1
If the character rigs use namespaces:
1. Select ann Joints and Meshes associated with one of the characters.
2. Go to the Object Properties panel.
3. Under the Fbx export tab, enable Use namespaces:

After this, the export should work without issues.
Solution #2
For character rigs that do not use namespaces:
1. Select all Joints and Meshes associated with one of the characters.
2. Use the Scene from selected objects preset in the export dialog:

This too should work fine.
A Mesh and its root object have the same name
In this case, you’ll need to rename the Mesh:
1. Select the Mesh (in the Outliner, or using the Mesh edit mode).
2. Go to the Object Properties panel.
3. Change the name of the Mesh (it is found in the Name field at the top of the panel):

Some of selected for export transform's parents are not being exported
There can be a few reasons for this.
First, the root object can be on an Animation Track that is hidden.
The solution for this is to make the Track visible. This is done by clicking the eye icon on the Tracks panel:

Alternatively, the reason can be that the root object has its Is exported parameter disabled:

In this case, simply enable it (it is found on the Object Properties panel, under the Fbx export tab).
Note
Some root objects do not have the Fbx export behavior, and thus can’t be exported. If the model’s hierarchy is parented to an object like this, it can’t be exported as well.
To fix this, you’ll need to unparent the character from the root.
To do that, right-click the model and select Unparent selected from the drop-down menu.
Problems with parsing FBX
If you are having troubles with using FBX files exported from Cascadeur, try using Collada instead
File format can be selected during export, in the Save File dialog
Models are imported with incorrect scale
Try using scale-related options (such as Scale Compensate in Maya) when importing Cascadeur models to other software.. If this doesn't help, try using different file formats
Multiple root bones
Delete the root bones you don't need and leave only one.
A bone can be deleted by:
1. Switching to the Joint Mode.
2. Selecting a bone you want to delete.
3. Selecting Delete objects from the Objects menu (or pressing Del).