Import GLB/GLTF/VRM
- Home
- Getting Started
- Import GLB/GLTF/VRM
This page describes how to import GLTF/GLB and VRM files to Cascadeur.
For other supported file formats see:
To import a GLTF/VRM file:
1. Select Import Glb/Gltf/VRM from the File → Import menu:

2. You’ll see this dialog:
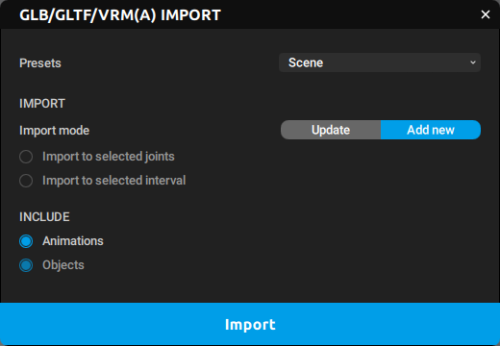
3. Here, set the import settings:
Presets
Here, you can select one of the predefined setting schemes, each one optimized for a particular task.
There are several available variants:
Add model is for importing the 3d meshes (without Joints) and attaching them to the Joints in the scene.
Add model to selected is same as the above, but it only attaches meshes to the Joints that are currently selected.
Animation is for importing animation data to the skeleton hierarchy present in the Cascadeur scene.
Animation to selected frames imports animation data to the skeleton hierarchy present in the Cascadeur scene and applies it to the frames that are currently selected on the Timeline.
Animation to selected objects also imports animation data, but applies it to the currently selected objects in the scene.
Model is for importing the 3d meshes and Joints, without animation attached to them.
Scene imports the entire Cascadeur scene.
There is also the Custom option. It is used when you manually set the import parameters (described below). It doesn’t have any default values associated with it.
IMPORT
This section contains settings that define how exactly should the model be added to the scene.
Import to selected joints
If this option is enabled, the model is applied only to the selected Joints.
Can be used when, for example, you need to use different meshes for several identical skeletons.
Import to selected interval
If this option is enabled, the imported animation is applied only to the selected part of the Timeline.
INCLUDE
This section contains settings that define what parts of the model should be added to the scene.
Animation
If this option is enabled, animation data from the imported file is applied to the current scene.
Objects
If this option is enabled, the 3d objects from the imported file are added to the current scene.
4. Click Import and choose a file to add to the scene.
5. After this, the content of the file should be added to the scene.
This is how GLTF files are imported to Cascadeur.