Meshes
- Home
- Rig
- Rig Structure
- Rig Elements
- Meshes
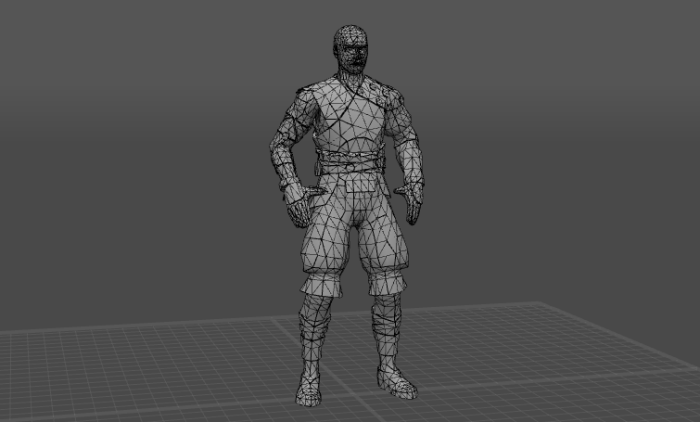
This mode hides all parts of the character rig and leaves visible only meshes - 3d objects used to represent a character in the scene. Every character is made of one or several meshes that can be deformed by adjusting the rig attached to them.
Meshes can be selected by clicking them with the  , like any other scene object. Selected meshed are colored yellow in the Viewport.
Rendering Modes
Meshes can be rendered in two different ways: the Shaded Meshes mode and the Wireframe Meshes mode.
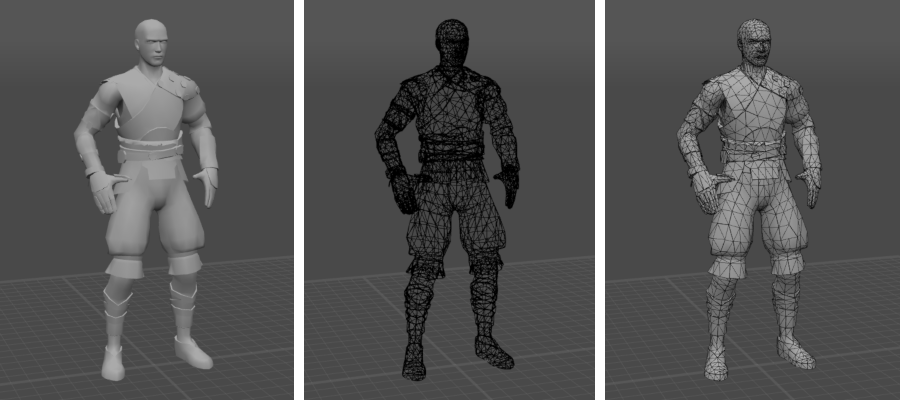
The Shaded Meshes mode (left), the Wireframe Meshes mode (middle) and a combination of the two (right)
Mesh rendering modes are enabled and disabled from the Visible menu. Both modes can be enabled (or disabled) at the same time.
The color of the meshes can be set in the Settings window (available through the Settings menu).
Textures (Deprecated)
Warning
This feature has been deprecated; it is only available in versions 2025.3 and earlier.
In more recent versions, you can use Materials to apply textures to models.
Warning
By default, the texture tool is disabled on the Toolbar.
To make it accessible, open the Settings Window and enable the tool in the Toolbar Visible section.
A Texture is a 2D image that is applied to a Mesh to simulate color scheme of the object surface and the fine details on it.
Textures can be controlled with two buttons on the Toolbar:
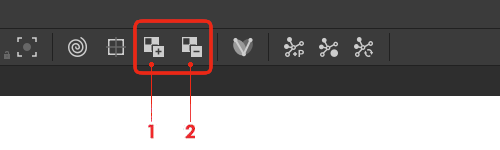
(1) Bind Texture applies a texture to the selected mesh.
Supported file fomats are: .png, .tga, .bmp and .jpg
(2) Unbind Texture removes the texture previously applied to the selected mesh.
These options are also available through the View menu:

Animated Textures
You can also import animated textures. There are two ways to do this:
First, you can import a video file as a texture.
To do this:
1. Select File → Import → Reference video.
2. Select a video file.
Currently, only the .mp4 files are supported.
After this, a plane containing the video should appear in the scene.
This option is only intended for setting up animated references. It won't work with character models.
So if you'd like to apply an animated texture to a character, you should follow a different set of steps:
1. Prepare a sequence of images named something like this:
tex_000.png, tex_001.png, tex_002.png and so on.
2. In Cascadeur, switch to the Mesh Mode.
3. Select a mesh.
4. Click the Bind texture button.
5. Select every file you want to use for your animated texture.
After this, the texture should be applied to the model. One file of the sequence is equal to one frame of animation.
Materials
Aside from the regular textures, there are also Materials - a more complex way of rendering mesh objects, with much more lifelike results.
Materials are automatically created when importing 3d meshes from FBX files. If you want to use Materials with outdated scenes, use the Fix Scene option in the File menu.
Warning
Currently, Cascadeur cannot import materials from FBX or MTL files.
If you have a material you’d like to use in a scene, you’ll need to manually assign texture maps to the standard Cascadeur material.
Node-based materials are not supported either.
Nor are the UDIM textures.
Settings for Materails are available on the Material tab of the Object Properties panel:
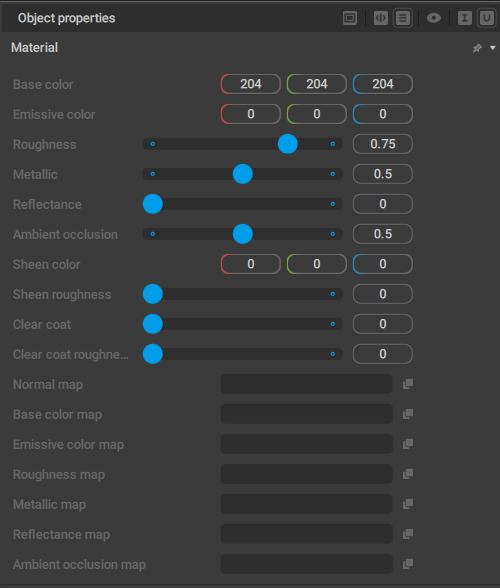
Base Color
Sets the default color for the surface.

An example of a material with Base Color set to different values.
Emissive Color
Sets the color for the light that the surface emits.
If the value is set to the color black (0, 0, 0), no light is emitted (this is the default value).

An example of a material with different emission settings.
Roughness
Sets the roughness of the surface, i.e. the sharpness of the reflection.
This value can change from 0 (perfectly sharp reflection) to 1 (very soft).

Metallic
Sets the metallicity of the surface, i.e. how well it reflects light.
This value can also change from 0 (no light is reflected) to 1 (all light is reflected).

Reflectance
Sets the strength for specular reflections.
The value can change from 0 to 1; the default value is 0.

This example uses a darker Base Color so the specular highlights would stand out more.
Ambient Occlusion
Sets the strength of the ambient occlusion (self-shadowing) effect.
The value can change from 0 (the effect is fully visible) to 1 (the effect is completely invisible).
The default value is 0.5.

Ambient occlusion value from 0 to 1.
Sheen Color
Sets the color for the sheen: an effect that simulates very small fibers on the surface. This is mostly used for imitating cloth or dusty surfaces.

An example of the Sheen Color with different values; the Sheen Roughness (see below) is set to 1.0.
This example also uses a darker Base Color to make the effect more visible.
Sheen Roughness
Sets the roughness value for the sheen effect.

Sheen Roughness from 0.0 to 1.0.
Clear Coat
Sets the strength for the ‘clear coat’ effect that simulates an additional layer of material on top of the surface. Used for portraying things like lacquer surfaces or car paint.

Clear Coat from 0.0 to 1.0.
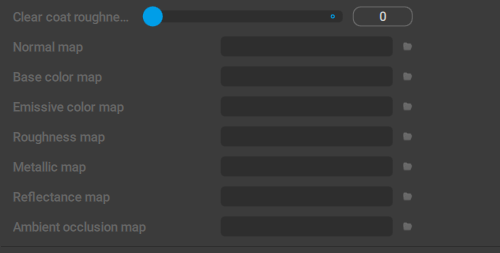
Clear Coat Roughness
Sets the roughness for the clear coat effect.

Clear Coat Roughness from 0.0 to 1.0.
Material Textures
Aside from the numerical settings described above, Materials in Cascadeur include several texture channels:
They can be used to apply textures (2D images) to the model, customizing its appearance.
Textures work in conjunction with the parameters described above: for example, if you set a texture for the base color, you can use the Base Color value to adjust its hue.
The available texture channels are:
Normal map
Sets the texture for the normals.
Base Color Map
Sets the texture for the base color of the surface.
Emissive Color Map
Sets the texture for the light emitted by the surface.
Roughness Map
Sets the texture for controlling the roughness of the surface.
Metallic Map
Set the texture for controlling the metallicity of the surface.
Reflectance Map
Sets the texture for controlling the reluctance value of the surface.
Ambient Occlusion Map
Sets the texture for the ambient occlusion effect.
To add a texture to a channel, click the folder icon at the right side of it. This will open a standard ‘open file’ dialog where you can select an image to be used as a texture.
To remove a texture from a channel, simply erase the path to it in the corresponding field.
Mesh Settings
A specific set of settings is available for Meshes in the Outliner window.
Fbx Export

This set of options controls how Joints and Meshes are exported to the FBX format.
Rotation order

This parameter sets the rotation order used for the selected object.
When you export your animation, custom rotation order might be necessary to bypass the gimbal lock problem. This problem does not occur in Cascadeur itself because instead of Euler angles it uses quaternions for calculating rotations.
Is exported
If this is enabled, the object is exported to the FBX format. Otherwise, the object is ignored during export.
Export translate animation
If this is enabled, the object's transations (changes in its coordinates) are exported to the FBX format. Otherwise, they are ignored.
Export rotate animation
If this is enabled, the object's rotations (changes in its spatial orientation) are exported to the FBX format. Otherwise, they are ignored
Export scale animation
If this is enabled, the object's scale is exported to the FBX format. Otherwise, the scale reamains constant.
Use namespaces
If this is enabled, the name of the exported object would include its namespace. This can be used when a scene has two or more identical objects (such as two characters with the same mesh), so the namespace is necessary to distinguish them.
Otherwise, the namespace is ignored.
Disabled by default
Mesh object

This set of options defines how Meshes are show in the Viewport.
Render layer
This defines how the mesh object is rendered in the scene:
Ghosted means the object’s Ghosts (are drawn on top of the object itself (so they won’t be obscured by it).
Mesh means the object’s Ghosts are not drawn at all.
Reference means the mesh is rendered as a reference object: semi-transparent and behind all other objects.
By default, the Ghosted option is used.
Is transparent
If this is enabled, the mesh object is rendered as transparent.
Disabled by default.
Is both side
If this is enabled, the mesh object is rendered as two-sided (normally, a mesh has only one visible side).
Also disabled by default.
Always show textures
If this is enabled, textures applied to the mesh are always visible, even under Edit Modes (such as Point Controller Mode) where they normally aren't.
Use color
If this is enabled, you can set a custom color for the mesh (using the Color parameter).
Disabled by default.
Color
Sets a custom color for the mesh. Only works when Use color is enabled.
Linked objects
The list of the Joints linked to the mesh and used to deform it.
Creating Meshes
Cascadeur also includes basic options for creating meshes.
- To create a plane, select Add → Plane from the Commands menu.
- To create a cube, select Add → Cube from the same menu.
- To create a sphere, select Add → Sphere.
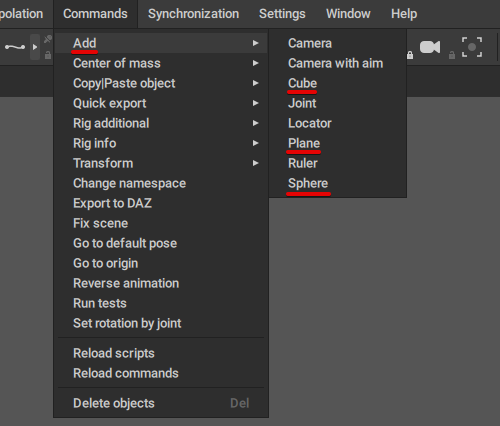
These additional meshes are generally used to outline the scene environment, but they can be parented to Joints and rigged just as well.
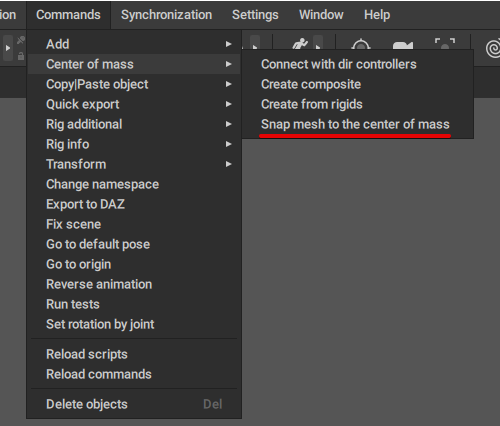
Snapping Meshes to the Center of Mass
When you import meshes into Cascadeur, you need to attach them to a Center of Mass for them to work correctly.
To do this:
1. Select the mesh.
2. Select the Center of Mass.
3. Select Center of Mass → Snap mesh to the center of mass from the Commands menu: