Cascadeur for 3ds max users
- Home
- Getting Started
- For Other Software Users
- Cascadeur for 3ds max users
This page provides an introduction to Cascadeur from the viewpoint of a 3ds max user. Its purpose is to help you to translate your existing experience into Cascadeur.
The Basics
Cascadeur is not a general-purpose 3D solution. It is not designed for creating 3D models or skinning them to joints/bones. Characters should be prepared for animation beforehand, in other programs.
3ds max and Cascadeur use similar approaches to animation. What you need to do is to create keyframes and define character poses for them, while the software will do the rest.
However, there are some differences:
3ds max |
Cascadeur |
| You need to enable Set Key mode before working with keyframes |
You can work with keyframes right after the scene is loaded |
| You need to set the pose first, then you can add a keyframe |
You need to add a keyframe and then set a pose for it |
| Each time you alter a pose, you need to reset the keyframe for it |
Each time you alter a pose, you need to reset the keyframe for it |
| Keyframes can be set separately for translation, rotation etc. |
A keyframe always contains every motion parameter |
Character poses and positions in Cascadeur are defined by keyframes.
Because of this, at least one keyframe is always present in the scene
Every frame in Cascadeur - including non-key ones - stores animation data. This means that regular frames can be moved, copied etc., much like keyframes.
By default, all keyframes in Cascadeur are placed on the same Animation Track and contain animation data for every object in the scene. However, there is still a way to animate only some of the objects in the scene, or a specific part of your character. Create an separate track for this part or object and place keyframes on that track.
The timeline in Cascadeur is discreet. It always includes an integer number of frames, and keys cannot be placed in the subframe space.
You do, however, still have full control over animation. It can be stretched, retimed and altered in other ways.
Graph Editor is present in Cascadeur. However, the standard Cascadeur control rig isn’t designed to be controlled via Graph Editor as it has no exposed Euler transforms (translation/rotation/scale).
You can attempt to control the rig via Point Controllers with parameters such as Swing, Twist, Vector Length, and IK Direction. However, compared to the standard Graph Editor usage, you will probably find such an approach cumbersome and unappealing.
Instead, the Cascadeur users are encouraged to refine their animation using the tools for tracking and editing the animation directly in the Viewport. These include:
- Frame ghosts
- Trajectory editing
- Filters for fixing animation errors
- Tools for mirroring poses
...and more.
Another feature of Cascadeur is its Physics Tools. This set of instruments can be used for easily creating physically accurate motions, as well as for improving the quality of the existing animations.
Interface
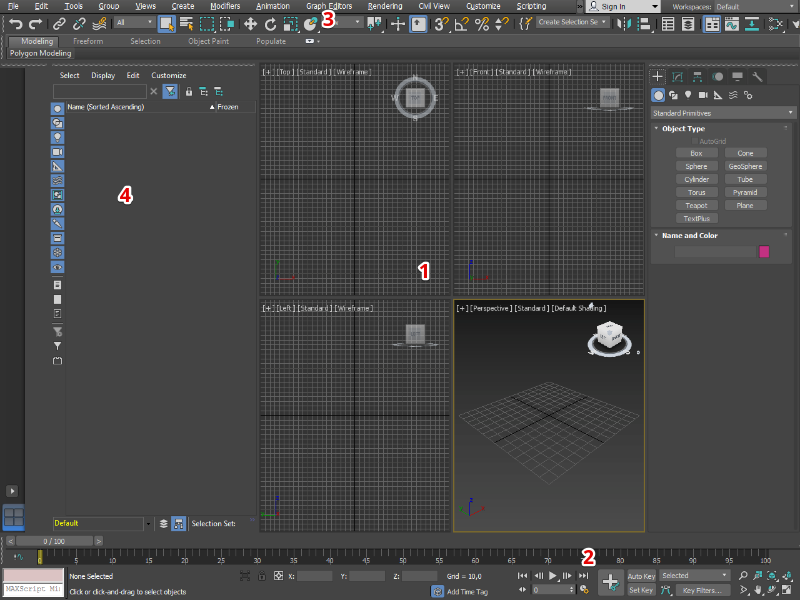
User interface in 3ds Max
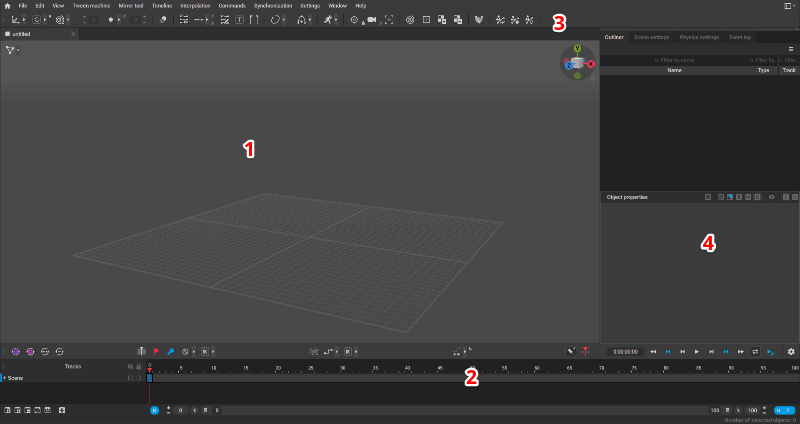
User interface in Cascadeur
1 - Viewport(s)
2 - Timeline/Animation & Time controls
3 - Toolbar/Main Toolbar
4 - Outliner/Scene Explorer
Quick Glossary
3ds max |
Cascadeur |
| Bone | Joint |
| Viewport(s) | Viewport |
| Main Toolbar | Toolbar |
| Animation/Time controls | Timeline |
| Main Menu | Main Menu |
Controls
Action |
3ds max |
Cascadeur |
| Camera Actions | ||
| Rotate Camera | Ctrl + R | Alt + LMB |
| Zoom Camera | Alt + Z | Alt + RMB |
| Pan Camera | Ctrl + P | Alt + Mouse Wheel |
| Selecting Objects | ||
| Select an object | LMB | LMB |
| Border Select | Hold LMB and drag | Hold LMB and drag |
| Manipulators | ||
| Translate an object | W | W |
| Rotate an object | E | E |
| Hide an object | Ctrl + H | V |
| Make all objects visible | Alt + U | Alt + V |
| Frames and Animation | ||
| Add Keyframe | K | F |