Viewport

Parts of the Viewport
Viewport in Cascadeur includes a number of parts:
(1) Viewport Window
The main program window. It shows the loaded scene, which you can edit using any tool the program gives you.
By default, Viewport includes one window. This window can be split into two smaller ones by pressing Shift+Spacebar and into four by presing Shift+Alt+Spacebar.
Each one of these smaller windows can be maximized by selecting it with  and pressing Shift+Spacebar or Shift+Alt+Spacebar again. This way you can also restore Viewport to its initial state.
(2) Camera (View Cube)
A scene is viewed through a virtual camera
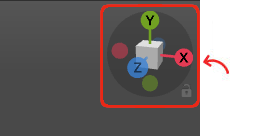
The Viewcube shows the spatial orientation of the camera and can be used to quickly switch between pre-defined views.
Clicking one of the cones switches the camera to one of the six orthogonal perspectives:
Red - the X axis (front and back for standard scenes included in Cascadeur)
Blue - the Z axis (right and left for standard scenes)
Green - the Y axis (top and bottom)
Clicking the cube itself switches projection modes between perspective and isometric.
If you hold Ctrl, moving the mouse over the View Cube would highlight its edges and vertices.
Clicking these edges and vertices would then set the camera to the corresponding perspective:

The lock symbol locks the camera to the current position so it won't move if you try to rotate.
The locked camera can still be panned and switched between six standard perspectives.
(3) Edit Mode Switch
This item is used for switching between Edit Modes.
Clicking the switch enables the next Edit Mode:
Clicking the sign at the right of the switch opens the list of all available Edit Modes:
(4) Align to camera
This item is used for aligning the Viewport to the currently selected Camera Object.
Clicking the triangle icon at the right side of it opens a drop-down menu:
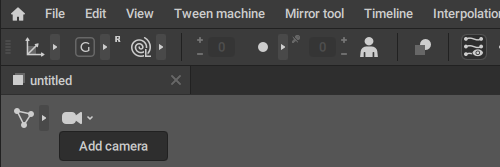
Add camera
Creates a new Camera Object.
Camera Textures
Another common use case is adding reference images to the camera. This is different from regular references in that such images are attached directly to the camera - not to an object in the scene - and cover the entire field of view.
This cannot be done with the default Viewport camera - but can be done with user-added Camera Objects.
See the Camera Textures section (on the Camera Tools page) to learn how to do this.
Visible and Selectable Menus
Right-clicking the Edit Mode Switch opens Visible and Selectable menus:

By editing this menus, you can change what types of scene elements you can see and use in each Edit Mode.
These menus are described in greater detail on the Edit Modes page.
Context Menu
The Context Menu contains a list of frequently used, predefined commands and keybindings. The Context Menu can be summoned by right-clicking an object in the Viewport or by right-clicking the Timeline.
Note
The context menu’s contents aren’t customizable and can’t be changed by the user.
Viewport Context Menu
The Viewport context menu is summoned by right-clicking a visible object in the scene space. It can also be summoned if the user clicks an empty space in the Viewport, if one or more objects in the scene are already selected.
Difference between the Context menu’s contents when right-clicking the selected AutoPosing controller and the empty space near it while the controller is still selected.
The contents of the Viewport context menu depend on the following factors:
- clicked object’s type
- clicked object’s selection status
- selection status of other objects in the scene

Customizing Viewport
The characters - and any other 3d objects too - in the Viewport are lit with a set of light sources. These light sources cannot be moved, but their other parameters can be customized.
For the intensity of the lights, there is a set of settings in the Settings Window, called Lights:

Ambient Intensity
The power of the environment light in the scene (sets the background lighting in the scene).
Set to 0.5 by default.
Camera Intensity
The powers of the ‘front’ light (lights the model from the camera POV).
Set to 0.3 by default.
Ground Light Intensity
The power of the ground light (the source that lights the model from below).
Set to 0.3 by default.
Sky Light Intensity
The power of the sky light (the source that lights the model from above)
Set to 0.7 by default.
There are also settings for the color of the Viewport background. These settings are not combined into a single group and can be found in the Visualizers section instead.
The ‘sky’ - the upper part of the Viewport background - is rendered as a gradient defined by two colors:
Sky Color Light
The lighter component of the sky gradient.
Sky Color Dark
The darker component of the sky gradient.
The ‘ground’, i.e. the lower part of the background, is also a gradient, and it too is defined by two colors:
Earth Surface Color Light
The lighter component of the ‘ground’ gradient (i.e. the lower part of the Viewport background).
Earth Surface Color Dark
The darker component of the ‘ground’ gradient.
Earth Surface Color
(TODO)
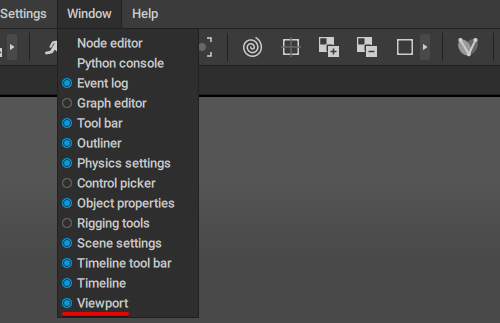
Detaching Viewport
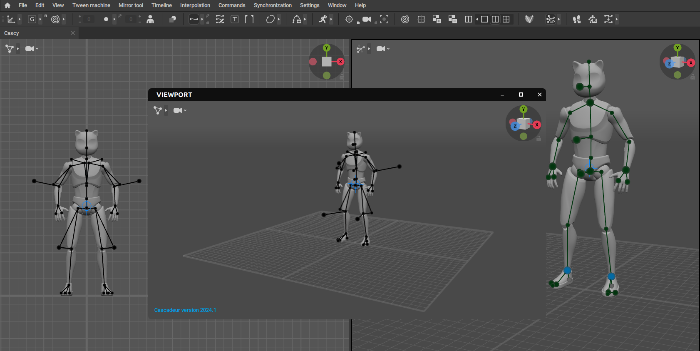
There is also an option to create a separate Viewport window.
This window is independent from the main Cascadeur window, and can be useful if you, for example, work with a multi-monitor configuration.
This is done by selecting the Viewport option from the Window menu:
Viewport Hot Keys
The camera can be controlled by holding the  key:
key:
 rotates the camera
 zooms the camera in and out; this can also be done by holding
  and rotating
 pans the camera
 switches camera view to the nearest orthogonal projection
 ,
,  and
and  switches the plane when you move the mouse
 focuses camera on the selected object
 rotates the camera
 zooms the camera in and out; this can also be done by holding
  and rotating
 pans the camera
 switches camera view to the nearest orthogonal projection
 ,
,  and
and  focuses camera on the selected object
Edit Mode hotkeys:
 toggles View Mode
 + switches between Point and Box Controller modes
- +
 separates the Viewport window in two parts
 - + + separates the Viewport window in four parts
 toggles View Mode
 +
+  separates the Viewport window in two parts