Twists and Untwists
- Home
- Rig
- Advanced Rigging
- Advanced Rigging Techniques
- Twists and Untwists
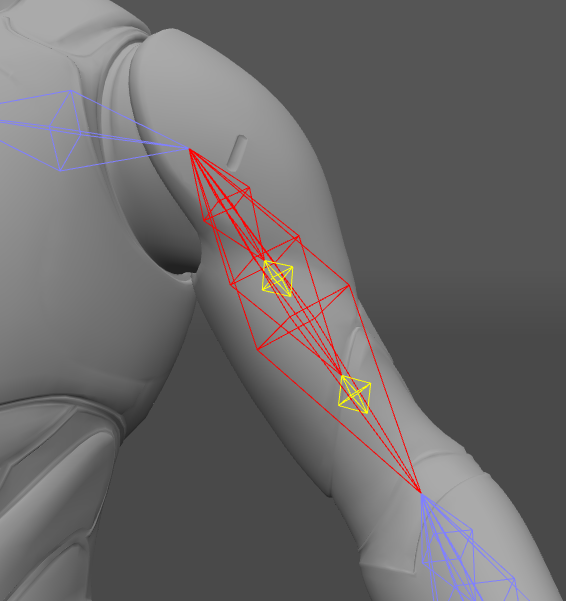
Example setup in the UE5 Manny character’s skeleton hierarchy, which includes one 'Untwist' joint (red) and two 'Twist' joint (yellow).
To facilitate a better mesh deformation, some complex character skeletons include auxiliary bones that inherit rotation from other bones or limit their own rotation on a certain axis.
To use their functionality in Cascadeur, we can use the Twist and Untwist behaviors.
Rigging Twist Joints
Unlike the main joints (pelvis, feet, hands, etc), which are rigged using the Point Controllers, the twist joints are rigged with the Box Controllers.
You can rig the twist joints either through the Quick Rigging tool or manually.
Rigging Twist joints with QRT
To rig the twist joints, switch to the Twists section in the Quick Rigging tool window.
Locate the twist joint in the skeleton hierarchy list on the left side, then drag and drop it into the corresponding slot - either one of the points in the middle or the empty slots on the right.
If you have multiple twist joints, click the Add new twist button to add another twist slot.

Twist strength can be adjusted via two settings - the Strength bool and the twist value field:
Twist value
A float value for setting up a user-defined twist strength.
Strength
Boolean setting for controlling how exactly the twist strength is set up.
If the setting is off, the value is set to the user-defined value.
If the setting is on, the value is calculated from the twist’s position on a line between the joint above the twist (e.g., the upper arm) and the joint below the twist (e.g., the forearm). For example, if the twist joint is located exactly in the middle between the upper arm and forearm, then its twist value is calculated and set to 0.5.
Note
All QRT-generated twist Rig Elements will be parented to the main limb’s Rig Element (e.g., forearm twists are parented to the forearm Rig Element) and inherit rotation from it, even if the twist joints in the skeleton hierarchy are parented to one another in a chain.
Rigging Twist joints manually
First, we’ll need to create Box controllers for the twist joints:
1. Select one or more twist joints.
2. Enable Only box controller and disable Use selection order.
3. Click Add rig element to create a box controller for the selected joints.
Next, we’ll need to add a Twist behavior to the Box controllers we’ve added earlier:
4. Select the joint from which the twist joint should receive its rotation and the Box controller that controls this twist joint.
5. On the Rigging tools panel, go to the Main actions section.
6. There, click the Set button. Repeat steps 4-6 for the other twists.
After that, we can adjust the Twist strength and Twist axis in the twist Box controller.
7. Select the twist Box controller
8. In the Object properties, go to the Proto Box behavior.
9. Edit the twist’s values and settings:
Twist strength
A value that dictates how much of the base rotation is transferred to the twist. For example, a value of 0.5 translates to 50% of transferred rotation.
Twist axis
A vector setting that dictates from which axis of the linked joint the rotation is inherited and to which axis of the twist Box controller the rotation passes.
Note that the joint and Box controllers may have different rotation orientations, so you may need to adjust the input and output axes in the twist after rig generation.
Twist uses joint rotation
When this setting is on, the twist inherits rotation from the joint that it’s linked to. If the setting is off, the rotation is inherited from the Box controller that the linked joint is rigged with, which may have an orientation that differs from the joint’s.

Customizing Twists After Rigging
Twist joints can still be customized even after rigging is complete. For this, a different set of parameters is used.
To access these parameters:
1. Select the Box controller associated with the twist bone.
2. In the Outliner, open the Twist tab.
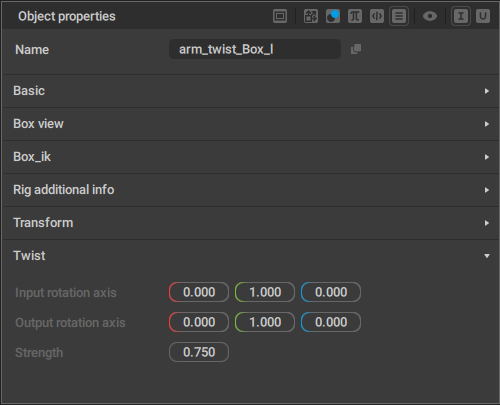
Input rotation axis
Set the axis of the 'parent' joint from which the twist should derive its rotation.
Output rotation axis
Sets the rotational axis for the twist bone.
Strength
Sets the strength of the effect.
Rigging Untwist Joints
While the 'Twist' behavior is used to pass the partial rotation of one joint to another, 'Untwist' behavior is used to counteract the joint’s rotation around its own axis.
'Untwist' behavior is meant to be applied to the RigElement objects in the character rig, specifically the Rigid Bodies used for the main body parts (arms, legs).
You can rig the untwist joints either through the Quick Rigging tool or manually.
A visual demonstration of Manny’s upperarm joint (red) with the applied Untwist behavior and two of its child twist joints (yellow). Notice that the upperarm joint is rotating up-down and left-right, but isn’t rotating around its own axis.
Rigging Untwists with QRT
To rig the Untwist joints, switch to the Twists section in the Quick Rigging tool window.
Turn on the Untwist… setting - this will automatically add an Untwist behavior to the specified joints.
Note that in the Quick Rigging tool window, Untwist can be added only to the upper parts of arms and legs - upperarms and thighs.

Rigging Untwists Manually
To rig an Untwist joint manually:
1. Select the parent, child and target RigElement that you want to put the Untwist on, in that exact order.
2. On the Rigging tools panel, go to the Main actions section.
3. There, click the Set button in the Untwist section.
If the rigging was successful, a message will appear in the bottom right corner of the Viewport, with the name of the ProtoBox belonging to the target RigElement that you put the Untwist behavior on.