Constraints (Alpha)
- Home
- Tools
- Animation Tools
- Constraints (Alpha)
A constraint is an entity that binds several objects in the scene, allowing one of them to control the positions of the other. Such a feature can be especially useful when you are creating animations that involve additional objects such as tools or weapons.
Warning
Currently, all constraints except for the Points and Points with Spherical Position constraints, can only be applied to one object
There are the following types of constraints:
Constrain points attaches selected Point Controllers to a transform object (i.e. an object that has position, rotation and scale parameters): a joint, a mesh, a locator, or a group.
Constrain transform binds one transform object to another.
Constrain additional is used for binding several Additional Point Controllers to each other.
Look At constraint binds two transform objects so one object’s rotation is determined by the other’s position (as if one object is ‘looking’ at another).
Points with Spherical Positions works similarly to Constrain points, but it also takes into account the radius (distance between the constrained Point and the center of the transform object) of the transform object.
Many of these constraints work with transform objects.
A transform object is an object that has all of the following parameters:
- Position (coordinates in the scene space)
- Rotation
- Scale
For example, a Joint is a transform object, as is a mesh or a locator.
A Point Controller is not a transform object, because it only has position with no rotation or scale.
Here, we’ll be taking a look at each one of these constraints, how they are applied and purposes they are used for.
Constrain Points
If you’d like to attach one or more Point Controllers to a transform object, use this option.
1. Select Point Controller(s)
2. Select a transform object.
A transform object is an object that has transform parameters - coordinates, rotations and scale - attached to it. A Mesh, for example, is a transform object, while a Point Controller is not (as it lacks both rotations and scale).
3. Select Constrain → Points from the Commands menu:

Once the constraint is created, it has to be activated in order for it to have effect.
To do this:
4. Select Point Controllers.
5. On the Timeline, select the interval on which you’d like to enable the constraint.
6. Go to the Object Properties panel.
7. On that panel, there will be the new Constraints behavior.
It contains Constraint index: a list of all constraints attached to the Point:

8. To activate a constraint, select your transform object from this list.
After this, the constraint will be enabled, and the Points will follow the transform object:

Constrained Point Controllers are marked with red circles in the Viewport window.
Warning
Keep in mind that the constraint will be enabled on the frames you’ve selected; on other frames, it’ll still be inactive.
This way you can enable/diable constraints or switch between them during animation.
Constrain Transform
For the cases when you need to associate objects that are not Point Controllers, you should use this option:
1. Select both objects.
2. Select Constrain → Transform from the Commands menu:

3. The Transform window will appear:

4. In this window, set the ‘main’ object. It will control the other object.
Once a constraint is created, it will be shown in the Outliner as a child object of the constrained object:

In this example, the Cube is constrained to the Sphere, so the constraint is attached to the Cube.
5. Select this object.
6. Go to the Object Properties panel.
7. There, find the Constraint section:

8. Enable the Constraint active parameter.
This will activate the constraint, and it will be taken into account when animation is played.
Note
This only constrains one object to another; if you need to constrain an object to multiple objects, use TransformMulti.
This section also includes several other parameters:
Constraint active
Same as in the behavior for Point Controllers (see above).
Constraint enabled on frame
Same as in the behavior for Point Controllers (see above).
Constraint rotation
This option defines how the rotation of the constrained object is affected when the object it is constrained to is rotated.
There are three possible values.
Compensate means the position of the constrained object is affected by the rotation of the object it is constrained to, but its global rotation is not affected:

Full means rotation is copied completely:
Off means rotation is not taken into account:
Constrain position
If this is enabled, the constrained object’s position is affected when the object it is constrained to is moving.
Just like in the previous case, these constraints can be switched on and off individually for each frame and interval.
TransformMulti
This type of constraint allows you to constrain several transform objects to one.
Warning
This tool will be reworked in the future versions of Cascadeur.
In the current version, it might not always work as intended.
To use it:
1. Select.the object that will act as a target.
2. Add the transform objects you’d like to constrain to the selection.
3. Select Constraint → Transform Multi from the Commands menu:

The first selected object will be designated as the ‘target’. Other selected objects will be constrained to it.
The constraint will be shown in the Outliner, attached to the target object:

Once selected there, it will be visible on the Object Properties panel:

There, it can be activated by enabling the Constraint active parameter.
This section also includes another parameter:
Controller index
Sets the index of the currently used constraint
Its default value is 0, which corresponds to the first constraint.
Constrain Additional
This constraint is used to link one part of the rig to another.
It can be useful for constraining long body parts: spines, tails and such.
1. Select several Additional Controllers.
You’ll need at least 3 consecutive Additional Points (the Rigid Bodies associated with these points should form a chain).
2. Select Constrain → Additionals from the Commands menu:

3. After this, the constraint should be created.
Once a constraint is created, it will be shown in the Outliner as a child object of the constrained object:

4. Select it in the Outliner.
5. Go to the Object Properties panel.
6. Find the Constraint section:

7. There, enable the Constraint active parameter.
This will activate the constraint, and it will be taken into account when animation is played:

This section also includes several other parameters:
Is inversed
If this is disabled, the Additional Points' rotation is inverted. (something happens).
Enabled by default.
Constrain angle addend
Sets the angle (measured in radians) that is added to the Additional Point’s rotation.
Can be used to offset the rotation.
By default, it is set to 0 (i.e. there is no offset).
Constraint coefficient
Sets how much the constrained Additional Points are influenced by the Ponts at the ends of the ‘chain’.
The default value is 0.5. Increasing the value leads to greater influence.
Look At Constraint
This constraint binds two transform objects in a way that makes one of the objects follow the other's direction, as if it is 'looking' at it.
1. Select two Transform objects.
2. Select Constrain → Look at from the Commands menu:

3. In the dialog that will appear, set one of the objects as a target:

4. The newly created constraint will appear in the Outliner:

5. Select it there.
6. Go to the Object Properties panel.
7. There, find the Constraint section:

8. In this section, enable the Constraint active setting.
With it enabled, the constraint will be taken into account:

Now, the constrained object follows the target's direction.
The Constraint group of settings also includes an additional parameter:
Up axis
These three values (X, Y and Z) set up the vector that’s used for calculating rotation.
Default values are 0.0, 1.0 and 0.0, meaning that the Y axis is used.
Points with Spherical Positions
This constraint is similar to Constrain Points, but with a major difference: it takes into account the distance between the points and the transform object’s center. Constrained points move across this center as if the transform object is a sphere.
1. Select the transform object.
2. Select the Point Controllers you’d like to constrain to it.
3. Select Constrain → Points with spherical position from the Command menu:

4. Enable the constraint.
Now, the constrained points will follow the transform object by a circular trajectory:

Left: no constraint; Right: Spherical position constraint.
Note the difference in the points’ trajectory.
Removing Constraints
To remove a constraint from a Point Controller:
1. Select the Point.
2. Select Constrain → Delete Point Constraint from the Commands menu:

3. After this, you’ll get a dialog with the list of constraints:

There, you’ll need to select a constraint that would be deleted.
After this, the constraint will be deleted from the scene.
Note
The Delete Point Constraints command only works with the Points and Points with Spherical Position constraints. Other constraints create a dedicated constraint object that's parented to the constrained object, which the user needs to delete in the Outliner manually.
Using Constraints
Activating Constraints
Simply creating a constraint won’t affect the animation. For it to have an effect, a constraint should be activated:
1. Select the constrained Point Controller (or several controllers).
2. Go to the Object Properties panel.
3. Open the Constraint tab:

4. There, select a cobstraint from the Constraint index list.
Now, when you move the ‘target’ object, constrained Points will follow it:

Active constraints are marked with red circles in the Viewport:
Keep in mind, however, that a constraint activated this way would only work for the current frame or interpolation interval (the one that is currently pointed by the Current Frame Indicator at the Timeline) on which the constraint is enabled.
Note
If you attempt to constrain the same objects to each other, you will encounter a cycle error. To prevent that, only one constraint has to be active for the object at any given moment.
How do Constraints work
By default, all objects move in either Global or Local space.
The Local space refers to the coordinate system that counts the Parent object as the 'center'. When you’re moving the Child object, its Local Position and Local Rotation values are being displayed relative to the Parent object.
The Global space refers to the global coordinate system of the scene, so you can say that the object is moving in the scene’s Local space.
When the constraint is activated, the controlled objects are put into the controller object’s Local space - that allows the controller object to manipulate the position and rotation of the objects constrained to it.
If you know how to use the constraints, you can find some creative ways to use them.
For example, you need to animate a scene with the character extracting the sword from the scabbard.
Instead of constraining the sword to the hand and animating the holding hand’s movement, you can first animate the sword being drawn out of the scabbard and then constrain the hand to it - that way, you won’t have to counter-animate the hand’s rotation to account for the sword’s blade being contained inside the scabbard.
Constraints and Interpolation
When a constraint is enabled on a keyframe, it only affects the constrained object’s position on that keyframe.
This means when you move the ‘target’ object, the constrained one would move along with it. This won’t affect its position on other frames.
When a constraint is enabled on an interval, the constrained object would move along with the target on the entirety of the interval, thus affecting the animation.

The same constraint active on a keyframe (left) and on an Interval (right).
As evident by the presence of a Trajectory, the second case causes the constrained Points to move along with the target object, while the first only affects their position on that specific key.
You might also encounter cases where constraints are in conflict with pre-existing animation.
For example, in this scene:

The character’s hands are supposed to be constrained to the sword - but as you can see, they don’t match its movement.
To fix this, you can remove keys from the constrained interval (leaving only the first and the last ones) - but only for the hands and not for the rest of the character. Optionally, you might also change the type of interpolation.
Once you do that, the result should looks much better:

Root Controller
Using Constraints, you can easily create a Root Controller: a tool that can be used to easily position the character as a whole.
Creating a Root Controller
To create a Root Controller, follow these steps:
1. Create a cube or any other transform object.
If you are creating a cube, for example, use Add → Cube from the Commands menu.
It is recommended to put this object on a separate Animation Track to make working with it more convenient.
To do this:
2. Before you create the cube, enable the Add to new layer option in the Commands → Add menu:

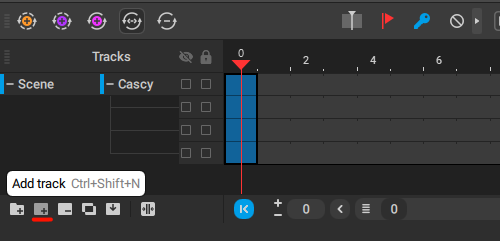
Alternatively, if you've already added it to the scene. you can select the object and click the Add track button at the bottom left corner of the Timeline:
It is also recommended to give this Track an unique name (such as Root).
The next step is to bind the character to the root object.
3. Select all the points of the rig.
4. Add the root object to the selection.
5. Select Constrain points from the Commands → Rig additional menu to create a constraint:
And with this, a Root Controller is created.
Using a Root Controller
Like any other constraint, once the controller is ready, it should be activated so it could be used to adjust the character’s position.
If you select any of the Point Controllers, you’ll see that they now have a new Constraint behavior on the Object Properties panel:
To activate the constraint, we'll need to select it from the Constraint index list in this group.
And with this, everything is set. Now you should be able to move the character by moving the root object.