Manipulators
- Home
- Tools
- Animation Tools
- Manipulators
Manipulators are tools used for adjusting character poses. They can be selected on the dedicated panel on the Toolbar.
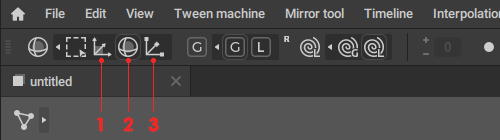
Panel for selecting Manipulators on the Toolbar
1. Translate (Hotkey:  )
)
 )
)
An example of Translate manipulator being used for moving an object across the scene
Used to move the selected object along coordinate axes. To move an object, place a mouse pointer over an axis (doing so will highlight the axis yellow), hold  and move the pointer.
The square between two axes represents the coordinate plane formed by these axes. Use it to move the object along the corresponding plane.
Place mouse over the circle at the center of the tool and hold to freely move the object around the screen space.
2. Rotate (Hotkey:  )
)
 )
)
An example of Rotate manipulator being used to change the spatial orientation of a scene object
This manipulator is used to rotate selected objects across coordinate axes. Axes are represented as circles.
To rotate an object, place a mouse pointer over a circle representing corresponding coordinate axis, hold and move the pointer.
Rotation is performed across a pivot point which can be set manually. By default, the center of the selected object is used as a pivot point (if multiple objects are selected, a pivot is assigned to the one with the highest position in the object hierarchy).
There’s also a different kind of pivot: one that takes local coordinates into account.
To use it:
1. Hold  +
+  .
.
2. Click a Point with  .
.
As shown above, doing this transfers local coordinate axes from the pivot point to the selection.
This feature only works with Local coordinates (see below). If you try to use it in the Global mode, there will be no effect.
3. Scale
This tool changes the scale of the selected objects.
During scaling, Cascadeur tries to preserve distances between selected objects as with any other kind of editing.
Scaling is performed in relation to a pivot point that can be set manually.
Scale manipulator is often used for editing object Trajectories
Local and Global Mode (Hotkey:  )
)
 )
)
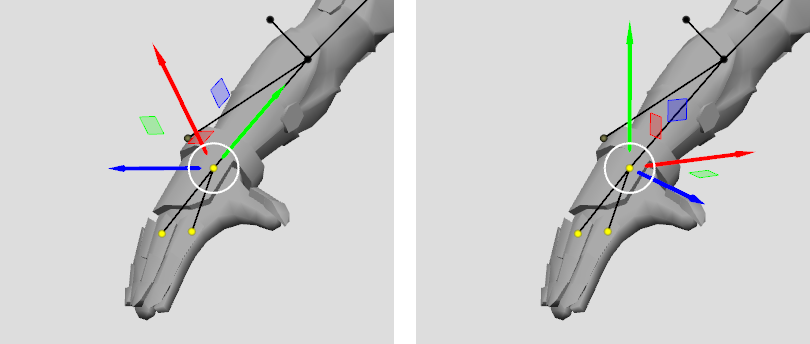
Translate manipulator in Local (left) and Global (right) modes
Every manipulator described above can operate in either Local or Global mode.
In the Global mode objects are moved, rotated or scaled in relation to the world coordinates that are always the same for every object in the scene.
In the Local mode, changes are applied to objects in relation to the object's own local coordinates that depend on the current position of the object.
Finally, if the Relative to pivot option is enabled, coordinates are calculated in relation to the current pivot point.
To enable this mode, click the R icon near the Global and Local buttons:

These modes are applied to every manipulator simultaneously.
Arrow Step
The Translate manipulator can also be controlled using arrow keys on the keyboard:
This option also works with Interval Edit Mode:
Under this mode, moving one point also moves the object's positions on the entire interval.
When you're using Arrow Step, pressing an arrow key once equals one 'step'. The length of this step, however, depends on the Arrow Step setting:
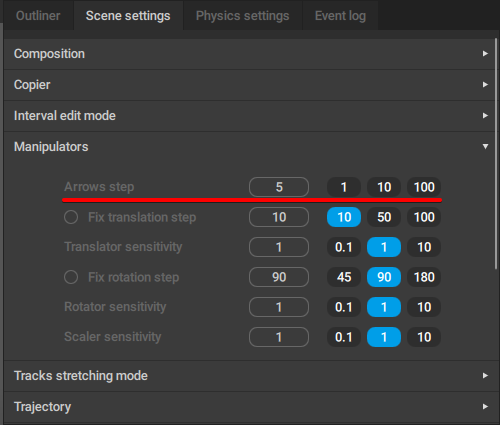
This setting is found on the Scene Settings panel, under the Manipulators tab. It defines how far the selected objects are moved when arrow keys are pressed.
The distance is measured in Cascadeur units (which are equal to centimeters in most cases). It can be set in the dedicated field.
The default value is 5.
Note
Arrow step moves selected objects in relation to the camera.
So if you need it to move the objects on the coordinate axes:
1. Switch the Viewport to the orthogonal mode.
To do this, click the View Cube.
2. Set the Viewport to one of the pre-defined projections
To do this, click one of the cones around the View Cube.
See the Viewport page to learn more about controlling projections.
Tail Mode (Hotkey:  +
+  +
+  )
)
 +
+ 
This option adds "tail" effect to object rotation: when an object is rotated, all its child objects rotate with it, like a tail.
The tail mode can be set to Global or Local independently from the rest of the manipulators.
To change a pivot point of rotation:
1. Select every object that you want to rotate.
2. Click a point controller with the to move rotation pivot to it

Using Manipulators
Selecting
Using , you can select any part of a manipulator - an axis, a coordinate plane or the circle at the center - but only one at a time.
Using
When the manipulator is selected, hold  and move the mouse pointer across the Viewport window to move selected objects. If an axis or a coordinate plane is selected, the object will move along it; if the central circle is selected, you can move the object freely in the screen space.
Slowing Down
Holding while using a manipulator on an object will make the object move ten times slower than normal. This can be used to position objects with greater precision.
Resizing
You can also adjust the visual size of the manipulators in the Viewport window. To do this, drag any part of the manipulator while holding and .
Switching Off
To switch off manipulators, choose the Select mode or press hotkey  .
.
Interval Edit Modes
Manipulators can be used to make changes either on one frame or on an interval. This subject is described on the Interval Edit Mode page.