Ballistic Trajectory
- Home
- Tools
- Physics Tools
- Ballistic Trajectory
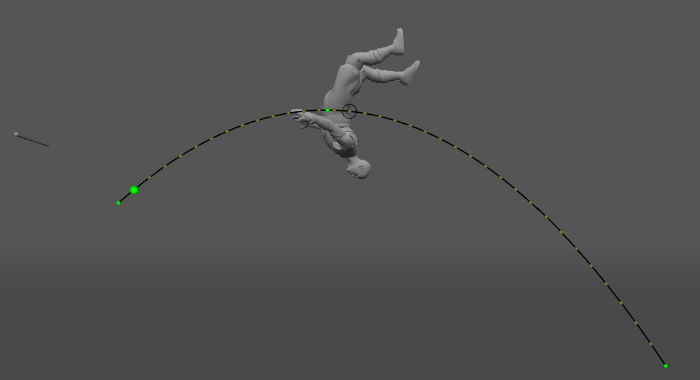
Ballistic Trajectory tool is used to calculate physically accurate trajectories for characters in the state of free flight. Using it enables animating realistic jumps, flights and other moves that require your character to get off the ground. Ballistic trajectories can be adjusted somewhat like regular trajectories, but they are created differently and serve different purpose.
Controls
Ballistic trajectory can be created and managed using the dedicated set of buttons on the Toolbar:
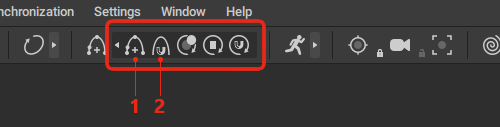
(1) Ballistic trajectory
This button adds a ballistic trajectory to the current scene.
(2) Snap centers of mass to selected trajectory
Pressing this button makes the character move so its center of mass is always aligned with the trajectory of the ballistic curve.
For this button to work properly, an interval on the Timeline should be selected beforehand. If you select a part of the interval on the timeline, the center of mass will snap to the curve only on the selected frames.
Ballistic Trajectory Structure
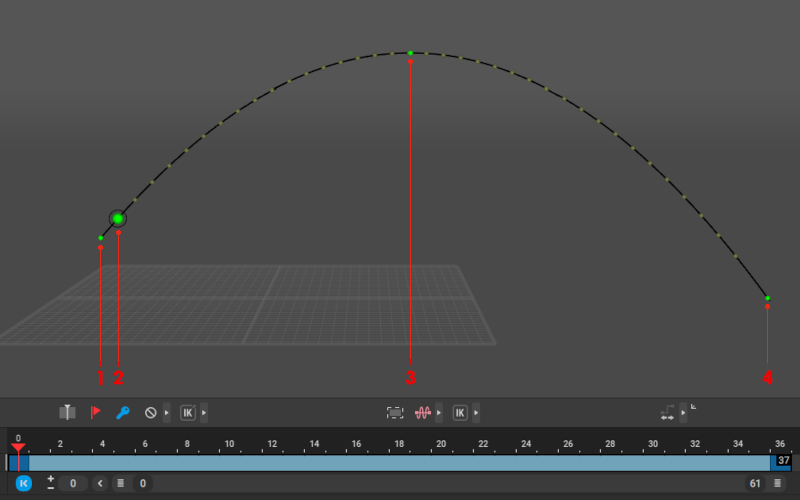
(1) Impulse Point
This point controls the impulse that is applied to the object at the start of its ballistic movement. It should coincide with object's center of mass
By moving Impulse point you can adjust every parameter of the ballistic curve: its length, its height, its direction, and its frame count (the number of frames that the object would spend travelling this trajectory)
Note
The length of a ballistic trajectory is represented on the Timeline as a black line.
(2) First Frame of the Ballistic Curve
This should be the last frame where the object is still on the ground
Moving this point adjusts the distance of ballistic movement without changing its frame count
(3) Point of Height
This point defines the maximum height of the ballistic movement (and subsequently its frame count). It can only be move up and down.
(4) Landing Point
The last frame of ballistic movement and the frame where the object touches the ground. This point can be used to adjust the distance of the ballistic movement without affecting its framecount
Grey dots on the ballistic curve represent frames. The current frame is marked with a circle.
Ballistic Settings
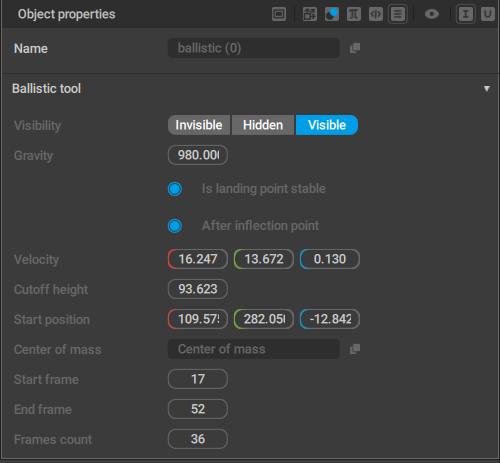
Ballistic Trajectories have a unique set of parameters associated with them for controlling various aspects of ballistic simulation.
These parameters can be acessed by selecting the trajectory and opening the Ballistic tab on the Object Properties panel.
Invisible/Hidden/Visible
Standard visibility options that define how the trajectory is rendered in the Viewport window:
- Visible: the trajectory is rendered in the Viewport.
- Hidden: the trajectory is not rendered in the Viewport. Hidden objects can be made visible by pressing
 (see Hiding Tool).
 - Invisible: the trajectory is not rendered and cannot be made visible by any means other than switching this setting to some other value.
 (see
(see Gravity
The gravity value for calculating ballistics.
Is landing point stable
If this is enabled, the end point of the trajectory is fixed, i.e. it won’t move when other points are adjusted.
Enabled by default.
After inflection point
Affects the shape of the trajectory. If enabled, the trajectory has a maximum point; if disabled, a more low-sloped curve is formed.
Enabled by default.
Velocity
The velocity vector (represented as three coordinates).
Cutoff height
This parameter sets the vertical position of the end point of the ballistic trajectory.
Start position
This is the position of the starting point (represented as the big green dot) of the ballistic trajectory.
Center of mass
The name of the center of mass of the object to which ballistics are applied.
Start frame
The starting frame of the ballistic trajectory
End frame
The final frame of the trajectory
Frames count
The length of the trajectory (in frames).